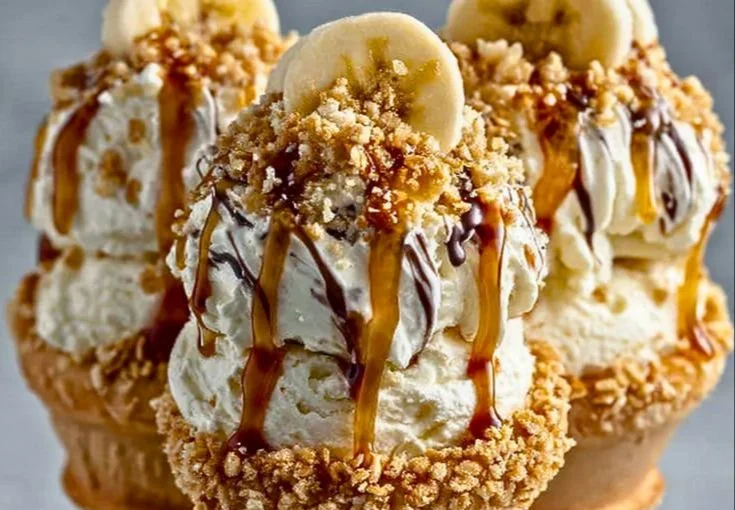
There’s something unmistakably magical about a warm summer day that invites sweet indulgences. Here’s a little slice of my childhood: I remember my grandma’s kitchen filled with laughter and the scent of freshly baked treats. On those lazy afternoons, we’d whip up banana pudding, her specialty. The coolness of the pudding, the ripeness of the bananas, and the crunch of vanilla wafers created a symphony of flavors that danced on our tongues. Fast forward to today, and I still crave that delightful combination—but with a modern twist. Enter Banana Pudding Cheesecake Cones, a playful and transportable homage to that beloved dessert.
Recipe Timing
- Prep Duration: 15 minutes
- Active Cooking: 0 minutes (no baking involved!)
- Total Duration: 45 minutes (including chilling)
- Portion Size: Serves 4-6
- Complexity: Simple
Nutritional Recipe
- Calories per portion: Approximately 230
- Protein: 3g per serving
- Carbs: 29g per serving
- Fats: 11g per serving
- Fiber: 1g per serving
- Sugars: 10g per serving
- Sodium: 150mg per serving
Why You’ll Love This Banana Pudding Cheesecake Cones
Just imagine this: a crisp ice cream cone filled to the brim with creamy cheesecake goodness, swirls of fresh bananas, and crunchy vanilla wafers. Each bite delivers a delightful mix of textures and flavors—every bit as comforting as grandma’s original recipe! Whether you’re hosting a summer barbecue, a birthday party, or just a rainy day with loved ones, this dessert is sure to bring a smile to anyone’s face. Best of all, it’s easy to whip up and even easier to share!
The Complete Cooking Journey
Let’s take a walk through the simple yet rewarding process of making these Banana Pudding Cheesecake Cones. From prepping your ingredients to enjoying the final delicious product, I’ll guide you through each step, ensuring that your experience is as sweet as the dessert itself.
Ingredients:
- 1 cup cream cheese, softened
- 1 cup whipped topping
- 1/2 cup powdered sugar
- 1 teaspoon vanilla extract
- 2 ripe bananas, sliced
- 1 cup vanilla wafers, crushed
- 4-6 cones (ice cream cones)
- Chocolate syrup or caramel (for drizzling, optional)
Method:
### Step 1: Prepare the Cream Cheese Mixture
In a bowl, mix the softened cream cheese, whipped topping, powdered sugar, and vanilla extract until smooth.
### Step 2: Add the Bananas
Gently fold in the sliced bananas into the cream cheese mixture, allowing those lovely banana flavors to meld.
### Step 3: Crush the Wafers
In another bowl, combine the crushed vanilla wafers. This will provide the perfect crunch for your cones.
### Step 4: Assemble the Cones
Take a cone and fill it with the banana pudding cheesecake mixture, alternating layers with the crushed wafers. Be generous—this is where the fun really begins!
### Step 5: Drizzle with Sweetness
Drizzle chocolate syrup or caramel on top if desired for that extra touch of indulgence.
### Step 6: Chill and Serve
Repeat with the remaining cones and chill in the refrigerator for about 30 minutes before serving to let those flavors set.
Serving Suggestions & Pairings
These Banana Pudding Cheesecake Cones shine on their own but can also be paired with a refreshing scoop of vanilla ice cream or a side of fresh berries. Dance your way into summer with a delicious iced tea or lemonade alongside for the perfect sunny day treat!
Storage & Leftovers Guide
If by some miracle you have leftovers (which I doubt with how delicious these are!), you can store them in the refrigerator for up to 2 days. Just be mindful that the cones will become a little soggy over time, so it’s best enjoyed fresh.
Kitchen Wisdom & Success Tips
- Choose Ripe Bananas: The riper the bananas, the sweeter your cheesecake filling will be!
- Don’t Skimp on the Chilling: Letting the cones chill in the refrigerator helps the flavors meld beautifully.
- Go Creative: Feel free to mix in other ingredients like mini chocolate chips or a sprinkle of cinnamon for a flavorful twist.
Flavor Variations & Adaptations
Love peanut butter? Fold in a bit of creamy peanut butter for a new flavor dimension! For a tropical twist, consider adding some shredded coconut or pineapple tidbits. There’s no wrong way to customize your cones!
Reader Questions & Solutions
-
Q: Can I use Greek yogurt instead of cream cheese?
A: Yes! It will provide a lighter feel, just be sure to choose a full-fat variety for creaminess. -
Q: What if I don’t have whipped topping?
A: No worries, you can whip up some heavy cream with a bit of sugar until soft peaks form. -
Q: How do I ensure my cones don’t get soggy?
A: Serve them immediately or use waffle cones which tend to hold up better than regular ice cream cones. -
Q: Is there a way to make this recipe dairy-free?
A: Absolutely! Use non-dairy cream cheese and whipped topping alternatives for a deliciously creamy effect. -
Q: Can I prep these ahead of time?
A: You can prep the filling (without the bananas) a few days in advance, but it’s best to fill the cones right before serving.
Wrapping Up
There’s something uniquely satisfying about transforming old family recipes into modern delights that fit our busy lives. These Banana Pudding Cheesecake Cones are more than just a dessert—they’re a sweet reminder of laughter, love, and the joy of sharing good food with family and friends. So roll up your sleeves, let your creativity shine, and enjoy the delightful journey of making these irresistible treats! Happy cooking!
PrintBanana Pudding Cheesecake Cones
A modern twist on a classic dessert, these Banana Pudding Cheesecake Cones are filled with creamy cheesecake, fresh bananas, and crunchy vanilla wafers, perfect for summer gatherings.
- Prep Time: 15 minutes
- Cook Time: 0 minutes
- Total Time: 45 minutes
- Yield: 4-6 servings 1x
- Category: Dessert
- Method: No Bake
- Cuisine: American
- Diet: Vegetarian
Ingredients
- 1 cup cream cheese, softened
- 1 cup whipped topping
- 1/2 cup powdered sugar
- 1 teaspoon vanilla extract
- 2 ripe bananas, sliced
- 1 cup vanilla wafers, crushed
- 4–6 ice cream cones
- Chocolate syrup or caramel (for drizzling, optional)
Instructions
- Prepare the cream cheese mixture: In a bowl, mix the softened cream cheese, whipped topping, powdered sugar, and vanilla extract until smooth.
- Add the bananas: Gently fold in the sliced bananas into the cream cheese mixture, allowing those lovely banana flavors to meld.
- Crush the wafers: In another bowl, combine the crushed vanilla wafers. This will provide the perfect crunch for your cones.
- Assemble the cones: Take a cone and fill it with the banana pudding cheesecake mixture, alternating layers with the crushed wafers. Be generous—this is where the fun really begins!
- Drizzle with sweetness: Drizzle chocolate syrup or caramel on top if desired for that extra touch of indulgence.
- Chill and serve: Repeat with the remaining cones and chill in the refrigerator for about 30 minutes before serving to let those flavors set.
Notes
Ensure bananas are ripe for sweetness. Store leftovers in the refrigerator for up to 2 days, but best enjoyed fresh.
Nutrition
- Serving Size: 1 cone
- Calories: 230
- Sugar: 10g
- Sodium: 150mg
- Fat: 11g
- Saturated Fat: 5g
- Unsaturated Fat: 6g
- Trans Fat: 0g
- Carbohydrates: 29g
- Fiber: 1g
- Protein: 3g
- Cholesterol: 20mg