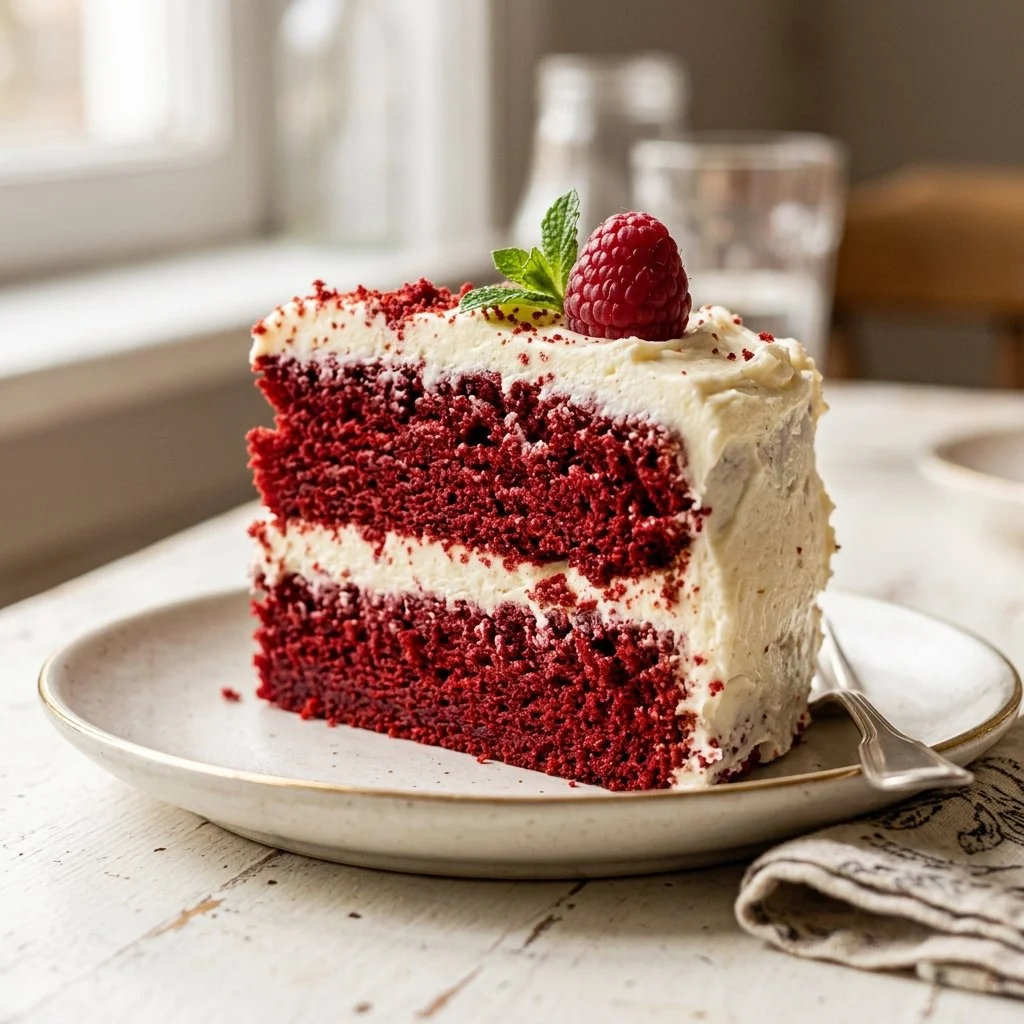
There’s something undeniably magical about a slice of red velvet cake. The rich, velvety texture and the vibrant crimson hue make it a centerpiece at any gathering, a true showstopper on a dessert table. I remember the first time I baked a red velvet cake—it was a chilly afternoon, my kitchen filled with the warm, spiced aroma of cocoa and vanilla. As I mixed the vibrant batter and watched it transform in the oven, I felt a rush of excitement. This cake wasn’t just a dessert; it was a celebration of life, love, and all things joyful. Whether shared at birthdays, anniversaries, or simply a Saturday afternoon treat, red velvet cake brings people together. I can almost hear the whispers of awe and delight as friends take their first bite. This is a recipe that you’ll want to share—and I’ll show you how to make it wonderfully irresistible.
Recipe Timing
- Prep Duration: 20 minutes
- Active Cooking: 30 minutes
- Total Duration: 50 minutes
- Portion Size: 12 servings
- Complexity: Simple
Nutritional Recipe
- Calories per portion: Approximately 400
- Protein: 4g per serving
- Carbs: 57g per serving
- Fats: 20g per serving
- Fiber: 1g per serving
- Sugars: 38g per serving
- Sodium: 300mg per serving
Why You’ll Love This Red Velvet Cake Recipe
The allure of red velvet cake lies not just in its stunning appearance but in its flavor—a subtle blend of cocoa, vanilla, and a hint of tanginess from buttermilk. The fluffy texture creates a delightful melt-in-your-mouth experience, and it pairs beautifully with a variety of frostings, but none quite capture the essence like classic cream cheese frosting. It’s rich, it’s decadent, and it’s truly a work of art in both preparation and presentation. Plus, the vibrant color brightens up any occasion, making it a favorite for celebrations big and small.
The Complete Cooking Journey
Let’s embark on this cake-making adventure! With simple yet effective steps, I’ll guide you from start to finish, ensuring your red velvet cake is nothing short of perfection. Ready your aprons, and let’s create some magic in the kitchen.
Ingredients:
- 2 1/2 cups all-purpose flour
- 1 1/2 cups sugar
- 1 teaspoon baking soda
- 1 teaspoon salt
- 1 teaspoon cocoa powder
- 1 1/2 cups vegetable oil
- 1 cup buttermilk, room temperature
- 2 large eggs, room temperature
- 2 tablespoons red food coloring
- 1 teaspoon vanilla extract
- 1 teaspoon white vinegar
Method:
Step 1: Preheat the Oven
Preheat your oven to 350°F (175°C). Grease and flour two 9-inch round cake pans to ensure the cakes slide out effortlessly once they’re baked.
Step 2: Sift the Dry Ingredients
In a bowl, sift together the all-purpose flour, sugar, baking soda, salt, and cocoa powder. This step is crucial to remove any lumps and to aerate the ingredients, leading to a lighter, fluffier cake.
Step 3: Mix the Wet Ingredients
In a separate large bowl, mix together the vegetable oil, buttermilk, eggs, red food coloring, vanilla extract, and white vinegar. You’ll want this mixture to be smooth and well combined, as it’s the heart of your cake’s flavor and moisture.
Step 4: Combine Dry and Wet Ingredients
Gradually add the dry ingredients to the wet mixture and mix until just combined. Be careful not to overmix; a few lumps are perfectly fine. This ensures your cake remains tender and soft.
Step 5: Divide the Batter
Divide the batter evenly between the prepared pans. You can use a kitchen scale for precision or just eyeball it—whichever brings you joy!
Step 6: Bake to Perfection
Bake in the preheated oven for 25-30 minutes or until a toothpick inserted into the center comes out clean. Keep an eye on them as every oven differs slightly.
Step 7: Cool the Cakes
Let the cakes cool in the pans for 10 minutes before transferring to a wire rack to cool completely. This step allows the cakes to firm up, making them easier to frost.
Serving Suggestions & Pairings
Red velvet cake is phenomenal on its own, but it shines even brighter when paired with a smooth cream cheese frosting, adorned with fresh berries, or sprinkled with chopped nuts for a little crunch. Serve it at a family gathering, a cozy tea party, or as a sweet indulgence after dinner. A hot cup of coffee or a chilled glass of milk makes the perfect companion to this delightful dessert.
Storage & Leftovers Guide
If you have any leftovers (which is rare!), store your red velvet cake in an airtight container at room temperature for up to three days. For longer storage, you can freeze the cake layers wrapped tightly in plastic wrap and aluminum foil for up to three months. Just make sure they’re completely cool before wrapping!
Kitchen Wisdom & Success Tips
- Room temperature ingredients matter! They blend more evenly and help create that luscious texture you’re after.
- Don’t skip the vinegar; it adds an essential tang that complements the sweetness beautifully.
- Customization is key! Feel free to adjust the amount of red food coloring to your preference. More color means more wow!
Flavor Variations & Adaptations
Get creative with your red velvet cake! Try infusing your batter with spices like cinnamon or nutmeg for a warm twist. You could also experiment with citrus zest for a fun flavor kick. If you want to avoid red dye, consider using beet juice for natural coloring.
Reader Questions & Solutions
-
Can I use regular milk instead of buttermilk?
Yes, buttermilk adds a tangy flavor and moisture. To make a substitute, add 1 tablespoon of vinegar or lemon juice to a cup of milk and let it sit for a few minutes. -
What frosting goes best with this cake?
The classic pairing is cream cheese frosting, but vanilla buttercream or chocolate ganache works well too! -
How do I know when the cakes are done baking?
Insert a toothpick into the center; if it comes out clean or with a few moist crumbs, they’re ready! -
Can I make this cake in advance?
Absolutely! Bake and cool the cakes, wrap them well, and store in the fridge or freezer until you’re ready to frost. -
What should I do if the cake layers dome while baking?
If your cakes dome, simply level them with a serrated knife once they’ve cooled. You can always use the crumbs for decoration!
Wrapping Up
Red velvet cake is more than just a sweet treat; it’s a labor of love that can charm anyone who encounters it. Whether it’s a birthday celebration, a holiday feast, or simply an afternoon pick-me-up, you’re sure to spread joy with every slice. So gather your ingredients, embrace the process, and don’t forget to enjoy the little moments of baking—it’s all part of the delightful journey. Happy baking!
PrintRed Velvet Cake
Indulge in a rich and vibrant red velvet cake, perfect for celebrations and special occasions.
- Prep Time: 20 minutes
- Cook Time: 30 minutes
- Total Time: 50 minutes
- Yield: 12 servings 1x
- Category: Dessert
- Method: Baking
- Cuisine: American
- Diet: Vegetarian
Ingredients
- 2 1/2 cups all-purpose flour
- 1 1/2 cups sugar
- 1 teaspoon baking soda
- 1 teaspoon salt
- 1 teaspoon cocoa powder
- 1 1/2 cups vegetable oil
- 1 cup buttermilk, room temperature
- 2 large eggs, room temperature
- 2 tablespoons red food coloring
- 1 teaspoon vanilla extract
- 1 teaspoon white vinegar
Instructions
- Preheat the oven to 350°F (175°C) and grease two 9-inch round cake pans.
- Sift together the all-purpose flour, sugar, baking soda, salt, and cocoa powder in a bowl.
- Mix the vegetable oil, buttermilk, eggs, red food coloring, vanilla extract, and white vinegar in a separate large bowl.
- Combine the dry ingredients with the wet mixture until just mixed, being careful not to overmix.
- Divide the batter evenly between the prepared pans.
- Bake in the preheated oven for 25-30 minutes or until a toothpick comes out clean.
- Cool the cakes in the pans for 10 minutes before transferring to a wire rack to cool completely.
Notes
Serve with cream cheese frosting for best results. Leftovers can be stored for up to three days.
Nutrition
- Serving Size: 1 slice
- Calories: 400
- Sugar: 38g
- Sodium: 300mg
- Fat: 20g
- Saturated Fat: 3.5g
- Unsaturated Fat: 16.5g
- Trans Fat: 0g
- Carbohydrates: 57g
- Fiber: 1g
- Protein: 4g
- Cholesterol: 50mg