Ah, the joy of summer picnics! Gathering with friends and family, basking in the sunshine, and indulging in delightful food always puts a spring in my step. One of my fondest memories is of my grandmother lovingly crafting her famous Italian sandwiches, layering vibrant flavors with care. The aroma of fresh bread, cured meats, and tangy roasted peppers still dances in my memory. Today, I’m excited to share a twist on that cherished recipe—the Pressed Italian Picnic Sandwich Loaf—that brings convenience and bold flavors to your next outing.
## Recipe Timing
- Prep Duration: 20 minutes
- Active Cooking: 0 minutes (no actual cooking!)
- Total Duration: At least 2 hours (or overnight for the best flavor)
- Portion Size: Serves 6-8
- Complexity: Simple
## Nutritional Recipe
- Calories per portion: Approximately 450
- Protein: 25 grams
- Carbs: 35 grams
- Fats: 25 grams
- Fiber: 2 grams
- Sugars: 5 grams
- Sodium: 900 mg
## Why You’ll Love This Pressed Italian Picnic Sandwich Loaf
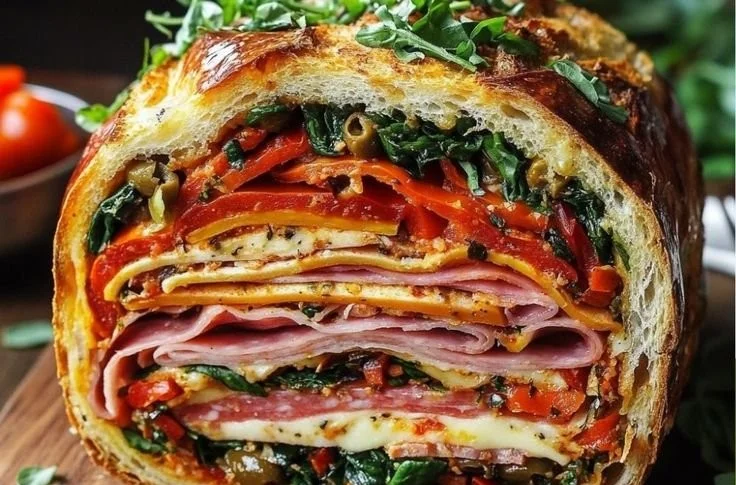
What’s not to love about a dish that combines beautifully crusty bread with layers of salami, ham, provolone, and roasted peppers? This sandwich loaf is not just a feast for the senses, it’s also easy to prepare and perfect for picnics, potlucks, or even just a cozy night in. The pressing process melds the flavors together, creating a compact yet flavorful bite every time. Plus, you can customize this sandwich to accommodate vegetarian friends by swapping out the meats for grilled veggies and hummus. It’s versatility at its finest!
## The Complete Cooking Journey
As we embark on this cooking adventure, I invite you to imagine the smell of rustic bread wafting through your kitchen and the vibrant colors of roasted vegetables brightening your workspace. The fun begins with an unassuming loaf of bread and transforms into an irresistible feast.
## Ingredients:
- Crusty bread (like ciabatta or a rustic Italian loaf)
- Salami
- Ham
- Provolone cheese
- Roasted peppers
- Olive tapenade
- Vegetarian options (grilled vegetables, hummus)
## Method:
### Step 1: Hollow the Crusty Bread
Slice the crusty bread horizontally and hollow out some of the insides to create room for the fillings.
### Step 2: Layer the Meats and Cheese
Layer the salami, ham, provolone, roasted peppers, and olive tapenade evenly on the bottom half of the bread.
### Step 3: Add Vegetarian Delights (if desired)
If opting for vegetarian options, layer grilled vegetables or spreads like hummus instead.
### Step 4: Press the Top Half Down
Place the top half of the bread back on and press down firmly.
### Step 5: Wrap and Weigh
Wrap the sandwich tightly in plastic wrap and place a weight on top to press it further.
### Step 6: Refrigerate for Flavor
Refrigerate for at least 2 hours, or overnight for the best results.
### Step 7: Slice and Serve
Slice and serve cold or at room temperature.
## Serving Suggestions & Pairings
This sandwich loves a sidekick! Pair it with a fresh green salad, some crispy potato chips, or a fruit platter for a delightful picnic spread. Consider a refreshing iced tea or a zesty lemonade to drink while savoring each bite.
## Storage & Leftovers Guide
Any leftovers can be wrapped tightly in plastic wrap and stored in the fridge for up to three days. However, I doubt there will be any leftovers once your guests get a taste!
## Kitchen Wisdom & Success Tips
- Make sure to choose a sturdy bread that can hold the fillings without falling apart.
- If time allows, letting the sandwich sit overnight in the fridge will enhance the merging of flavors even more.
- Experiment with different cheeses or spreads based on your preferences. A spicy mustard could be a fantastic addition!
## Flavor Variations & Adaptations
Feel free to switch up the ingredients! Use different meats like turkey or roast beef, or try assorted cheeses like mozzarella or goat cheese. For a Mediterranean flair, add sun-dried tomatoes or artichoke hearts!
## Reader Questions & Solutions
-
Can I use a gluten-free bread for this recipe?
Absolutely! Just make sure to choose a sturdy variety to hold the fillings well. -
What if I can’t find roasted peppers?
No worries! You can roast your own by charring whole bell peppers over a flame or in an oven until the skins are blistered, then peeling them off. -
How can I make this sandwich ahead of time?
This recipe is perfect for prep! Create it a day before, wrap it tightly, and let it chill in the fridge to meld those flavors. -
Can I freeze this sandwich?
While it’s best enjoyed fresh, you can freeze the unassembled sandwich. Wrap it tightly and store it for up to a month, then thaw in the fridge the night before you plan to enjoy it. -
What can I do if I don’t have olive tapenade?
Use pesto or a favorite condiment instead! Both add a vibrant flavor that complements the sandwich well.
## Wrapping Up
Bringing together flavors from my childhood with the Pressed Italian Picnic Sandwich Loaf has been a pleasure. I hope this recipe inspires you to create memorable moments around the table (or picnic blanket) with loved ones. Enjoy each layer, every bite, and the conversations that follow. Happy cooking!
PrintPressed Italian Picnic Sandwich Loaf
A delightful and convenient sandwich loaf layered with salami, ham, provolone, and roasted peppers, perfect for picnics.
- Prep Time: 20 minutes
- Cook Time: 0 minutes
- Total Time: 120 minutes
- Yield: 6-8 servings
- Category: Sandwich
- Method: No Cooking Required
- Cuisine: Italian
- Diet: Omnivore
Ingredients
- Crusty bread (like ciabatta or a rustic Italian loaf)
- Salami
- Ham
- Provolone cheese
- Roasted peppers
- Olive tapenade
- Vegetarian options (grilled vegetables, hummus)
Instructions
- Hollow the crusty bread by slicing it horizontally and removing some of the insides.
- Layer the salami, ham, provolone, roasted peppers, and olive tapenade on the bottom half of the bread.
- Add grilled vegetables or spreads like hummus if you prefer the vegetarian option.
- Press the top half of the bread back on and compress it firmly.
- Wrap the sandwich in plastic wrap and place a weight on top.
- Refrigerate for at least 120 minutes, or overnight for best flavor.
- Slice and serve cold or at room temperature.
Notes
Choose a sturdy bread to maintain the sandwich’s structure. Letting it sit overnight enhances flavor melding.
Nutrition
- Serving Size: 1 serving
- Calories: 450
- Sugar: 5g
- Sodium: 900mg
- Fat: 25g
- Saturated Fat: 10g
- Unsaturated Fat: 10g
- Trans Fat: 0g
- Carbohydrates: 35g
- Fiber: 2g
- Protein: 25g
- Cholesterol: 30mg