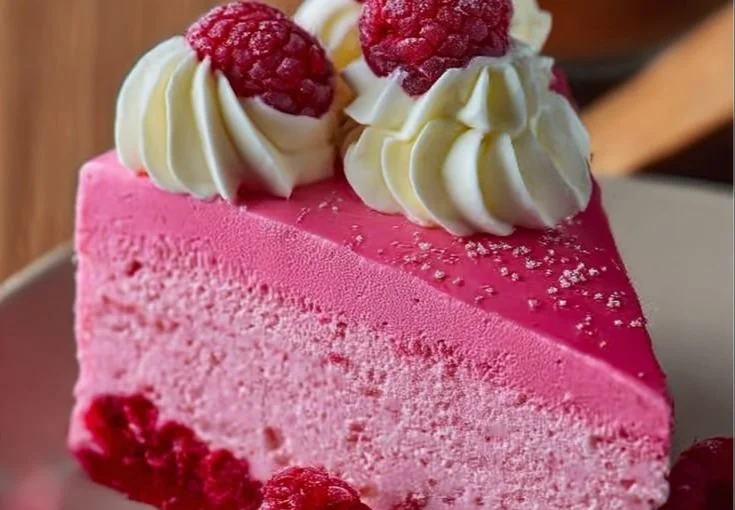
As the aroma of baking wafts through my kitchen, I’m transported back to my grandmother’s home. She had a magical way of turning the simple act of baking into an enchanting occasion. I can still hear the laughter and story-sharing that accompanied her delicious treats, especially on special days where desserts took center stage. One such dessert was her delightful raspberry cake, which inspired me to create my own version: a Pink Velvet Cake with a Raspberry Cheesecake Layer. There’s something irresistible about the combination of soft pink velvet cake contrasted with a creamy, tart raspberry cheesecake. It’s as if the colors of love and joy collide on a plate, making it perfect for birthdays, anniversaries, or simply a cozy afternoon with friends.
Recipe Timing
- Prep Duration: 25 minutes
- Active Cooking: 1 hour
- Total Duration: Approximately 1 hour 25 minutes
- Portion Size: Serves 8-10
- Complexity: Moderate
Nutritional Recipe
- Calories per portion: Approx. 350
- Protein: 6g
- Carbs: 29g
- Fats: 24g
- Fiber: 1g
- Sugars: 17g
- Sodium: 220mg
Why You’ll Love This Pink Velvet Cake with Raspberry Cheesecake Layer
This cake is as delightful to look at as it is to eat. The light, fluffy pink velvet base provides a subtle sweetness that pairs beautifully with the tangy raspberry cheesecake layer, resulting in a delicious balance of flavors and textures. It’s not just a treat for the taste buds; it’s a feast for the eyes! Plus, the versatility of this dessert allows it to shine at various festivities, where it becomes the star of the show.
The Complete Cooking Journey
Baking this cake is part science, part artistry. Let’s savor every step, from mixing the vibrant pink batter to carefully layering the creamy cheesecake on top, and ending with a whipped cream garnish that just screams indulgence. With each step in our cooking journey, you’ll build not just a cake, but a tradition that brings warmth and happiness to your table!
Ingredients:
- 1/2 cup all-purpose flour
- 1/4 cup granulated sugar
- 1/4 tsp baking soda
- Pinch of salt
- 1/4 cup buttermilk
- 1/4 cup vegetable oil
- 1/2 tsp vanilla extract
- 1/2 tsp vinegar
- 1/2 tsp pink gel food coloring or beet powder
- 1 egg white
- 16 oz cream cheese, softened
- 1/2 cup sour cream or Greek yogurt
- 2/3 cup sugar
- 2 large eggs
- 1 tsp vanilla extract
- 1/3 cup raspberry purée
- Optional: 1 tbsp lemon juice
- 1 cup heavy cream
- 2 tbsp powdered sugar
- 1 tbsp raspberry purée
Method:
Step 1: Preheat the Oven and Prepare Cake Pan
Preheat the oven to 350°F (175°C) and grease a round cake pan to get it ready for the deliciousness to come.
Step 2: Combine Dry Ingredients
In a bowl, mix together the flour, granulated sugar, baking soda, and a pinch of salt. This combination will form a delightful foundation for our cake.
Step 3: Mix the Wet Ingredients
In another bowl, combine the buttermilk, vegetable oil, vanilla extract, vinegar, pink gel food coloring (or beet powder), and egg white. This vibrant mixture will give the cake its beautiful hue.
Step 4: Combine Wet and Dry Ingredients
Pour the wet mixture into the dry ingredients and mix until smooth. This is the moment where those colors will beautifully blend together, creating a silky batter.
Step 5: Bake the Cake
Carefully pour the batter into the prepared cake pan and bake for approximately 25-30 minutes, or until a toothpick inserted in the center comes out clean. The kitchen will smell divine!
Step 6: Prepare the Cheesecake Layer
While the cake is baking, beat the softened cream cheese until smooth. Then, add in the sour cream (or Greek yogurt), sugar, eggs, vanilla extract, and raspberry purée. Mix until everything is perfectly creamy.
Step 7: Layer and Bake the Cheesecake
Once the cake has cooled, pour the cheesecake mixture over the top and return it to the oven for an additional 30-35 minutes. The cheesecake should be set but still have a little wiggle in the center.
Step 8: Make Optional Whipped Cream
For an indulgent finish, beat heavy cream with the powdered sugar and raspberry purée until soft peaks form. This will elevate your cake to the next level!
Step 9: Serve with Style
Once cooled, serve slices of your pink velvet cake with dollops of whipped raspberry cream on top. Each bite is pure bliss!
Serving Suggestions & Pairings
This cake can stand alone as the centerpiece of your dessert table but pairs beautifully with a cup of tea or coffee. You can also add fresh raspberries on the side or a sprig of mint for a pop of freshness.
Storage & Leftovers Guide
Store any leftover cake in an airtight container in the fridge for up to 4 days. The cheesecake layer stays beautifully moist, making it a delightful treat even after a couple of days.
Kitchen Wisdom & Success Tips
- Make sure all ingredients are at room temperature before you begin for the best texture.
- If you don’t have pink gel food coloring, beet powder is a fantastic natural alternative.
- Use a toothpick to test your cakes; it should come out clean but feel free if a couple of crumbs cling to it—this means it’s perfectly moist.
Flavor Variations & Adaptations
You can switch up the flavors by using different fruit purees such as strawberry or blueberry, or even adding a hint of lemon zest for a bright kick. Additionally, try replacing the sour cream with mascarpone for an even richer cheesecake layer.
Reader Questions & Solutions
-
Can I use regular yogurt instead of sour cream?
Absolutely! Greek yogurt or regular plain yogurt will work perfectly as a substitute for sour cream. -
What if I don’t have gel food coloring?
Beet powder or even pomegranate juice can provide the beautiful pink color without the artificial additives. -
How do I know if my cheesecake is done baking?
The cheesecake should be set around the edges but will still slightly jiggle in the center. It will firm up as it cools. -
Can I freeze the cake?
Yes, you can freeze the cake without the whipped cream. Wrap it tightly in plastic wrap and foil, and it will last for up to three months. -
What’s the best way to cut the cake without making a mess?
Use a warm knife for slicing through the layers. Just dip the knife in hot water, wipe it clean, and then cut through!
Wrapping Up
Baking doesn’t just create wonderful desserts; it weaves together stories, memories, and moments shared with loved ones. As you bring together this Pink Velvet Cake with Raspberry Cheesecake Layer, remember that it’s not just about the delight on the plate, but the love and care you put into each step. Happy baking, and may your kitchen be filled with the joy that comes from creating something special!
PrintPink Velvet Cake with Raspberry Cheesecake Layer
A delightful pink velvet cake layered with a creamy raspberry cheesecake, perfect for celebrations and cozy gatherings.
- Prep Time: 25 minutes
- Cook Time: 60 minutes
- Total Time: 85 minutes
- Yield: 8-10 servings 1x
- Category: Dessert
- Method: Baking
- Cuisine: American
- Diet: Vegetarian
Ingredients
- 1/2 cup all-purpose flour
- 1/4 cup granulated sugar
- 1/4 tsp baking soda
- Pinch of salt
- 1/4 cup buttermilk
- 1/4 cup vegetable oil
- 1/2 tsp vanilla extract
- 1/2 tsp vinegar
- 1/2 tsp pink gel food coloring or beet powder
- 1 egg white
- 16 oz cream cheese, softened
- 1/2 cup sour cream or Greek yogurt
- 2/3 cup sugar
- 2 large eggs
- 1 tsp vanilla extract
- 1/3 cup raspberry purée
- Optional: 1 tbsp lemon juice
- 1 cup heavy cream
- 2 tbsp powdered sugar
- 1 tbsp raspberry purée
Instructions
- Preheat the oven to 350°F (175°C) and grease a round cake pan.
- Combine the flour, granulated sugar, baking soda, and a pinch of salt in a bowl.
- Mix the buttermilk, vegetable oil, vanilla extract, vinegar, pink gel food coloring, and egg white in another bowl.
- Pour the wet mixture into the dry ingredients and mix until smooth.
- Bake the batter in the prepared cake pan for 25-30 minutes or until a toothpick inserted in the center comes out clean.
- Beat the softened cream cheese until smooth, then add sour cream, sugar, eggs, vanilla extract, and raspberry purée.
- Layer the cheesecake mixture over the cooled cake and bake for an additional 30-35 minutes.
- Beat heavy cream with the powdered sugar and raspberry purée until soft peaks form.
- Serve slices of the cake with dollops of whipped raspberry cream on top.
Notes
Ensure ingredients are at room temperature for best texture. You can switch up fruit purees for different flavors.
Nutrition
- Serving Size: 1 slice
- Calories: 350
- Sugar: 17g
- Sodium: 220mg
- Fat: 24g
- Saturated Fat: 15g
- Unsaturated Fat: 9g
- Trans Fat: 0g
- Carbohydrates: 29g
- Fiber: 1g
- Protein: 6g
- Cholesterol: 95mg