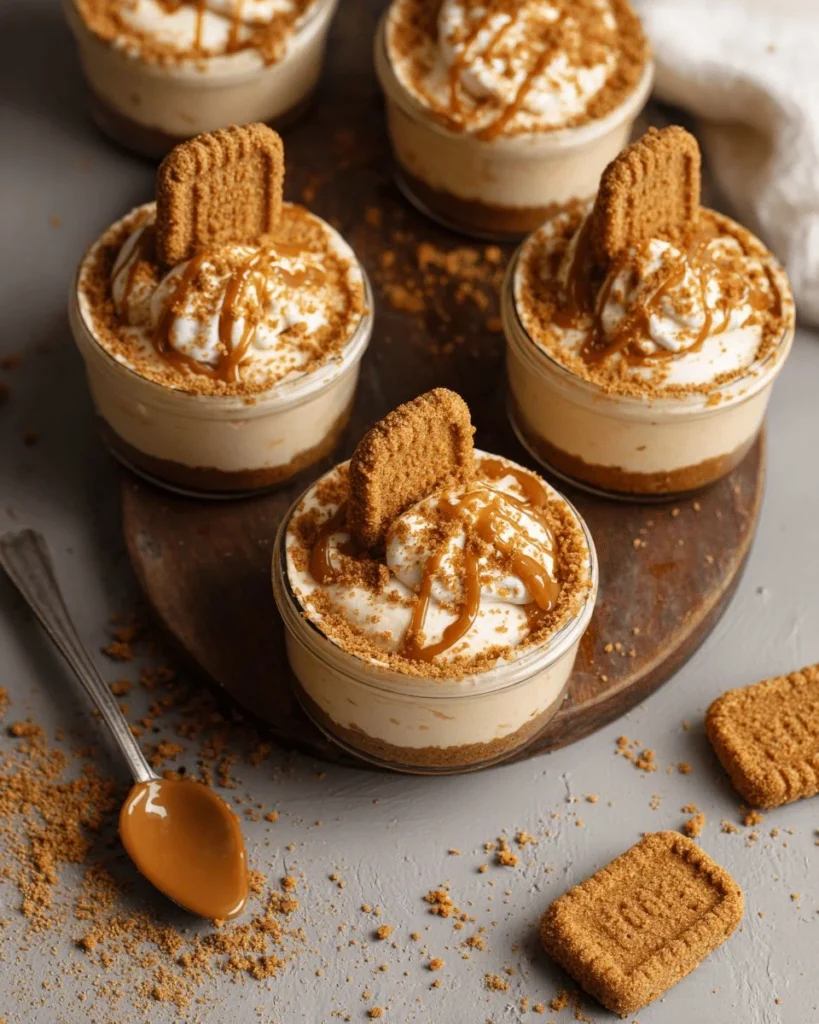
As a child, my dessert dreams were woven with the distinct aroma of spiced caramel—the warm, enchanting scent that drifted from the kitchen as my mother baked her famous treats. One of her best-kept secrets was the use of Biscoff cookies, their honeyed flavors creating the perfect crunch in any dessert. Fast forward to today, and I find myself recreating those beloved recipes with a twist, embracing the simplicity and indulgence of no-bake desserts. Today, I’m excited to share my No-Bake Biscoff Cheesecake Cups!
These cheesecake cups are a celebration of creamy textures and irresistible cookie crunch, serving as a delightful ode to those joyful childhood moments. Whether it’s for a special occasion or just a sweet treat for yourself, these cups promise to evoke nostalgia with every heavenly bite.
Recipe Timing
- Prep Duration: 15 minutes
- Active Cooking: 15 minutes
- Total Duration: 2 hours 15 minutes (including chilling time)
- Portion Size: Serves 4
- Complexity: Simple
Nutritional Recipe
- Calories per portion: Approx. 320
- Protein: 5g
- Carbs: 30g
- Fats: 22g
- Fiber: 1g
- Sugars: 15g
- Sodium: 180mg
Why You’ll Love This No-Bake Biscoff Cheesecake Cups
What’s not to love about a dessert that requires no baking but delivers maximum flavor? These Biscoff Cheesecake Cups bring together the lusciousness of cheesecake and the crispy zest of Biscoff cookies—a match made in dessert heaven! The silky cream cheese mixture paired with the crunchy, caramel-infused cookie layers results in an experience that’s both luxurious and satisfying. Plus, they take hardly any time at all to prepare, making them the perfect quick indulgence!
The Complete Cooking Journey
This dessert is all about layering flavors and textures. With just a handful of ingredients, you’ll transform your kitchen into a cozy confectionery. Let’s embark on this sweet journey together!
Ingredients:
- 8 oz cream cheese, softened
- 1/2 cup powdered sugar
- 1 tsp vanilla extract
- 1 cup heavy whipping cream
- 1 cup Biscoff cookies, crushed
- 1/4 cup Biscoff spread
- Extra Biscoff cookies for topping
Method:
Step 1: Cream the Base
In a mixing bowl, beat the softened cream cheese, powdered sugar, and vanilla extract until smooth. This is where your cheesecake base starts to come alive, so make sure it’s nice and creamy.
Step 2: Whip the Cream
In another bowl, whip the heavy cream until stiff peaks form. This is key for that fluffy texture that makes cheesecakes so delightful.
Step 3: Fold it All Together
Gently fold the whipped cream into the cream cheese mixture. Take your time here; you want to maintain that airy texture.
Step 4: Prepare the Biscoff Layer
Divide the crushed Biscoff cookies into serving cups, layering some at the bottom. This crunchy layer is the perfect base that adds texture to your dessert.
Step 5: Assemble the Cheesecake Mixture
Spoon the cheesecake mixture over the cookie layer. Be generous—every bite should be filled with creamy goodness!
Step 6: Drizzle and Garnish
Drizzle Biscoff spread on top and add more crushed cookies as a garnish. This is your chance to make it visually appealing—the more Biscoff, the better!
Step 7: Chill and Set
Refrigerate for at least 2 hours before serving. This resting time allows the flavors to meld beautifully, ensuring a truly delightful dessert experience.
Serving Suggestions & Pairings
These cheesecake cups shine on their own but can be elegantly paired with fresh berries or a scoop of vanilla ice cream for an extra indulgence. Consider serving them as part of a dessert buffet at your next gathering or enjoying them as a cozy treat after dinner with a cup of coffee or tea.
Storage & Leftovers Guide
If there are any leftovers (which is unlikely!), cover the cups tightly with plastic wrap or transfer to an airtight container. They will last in the fridge for up to 3 days. However, be mindful that the texture may change slightly as they sit.
Kitchen Wisdom & Success Tips
- Ensure your cream cheese is at room temperature to achieve a smooth mixture.
- When whipping the cream, start on low speed and gradually increase to high to avoid splattering.
- For an extra layer of flavor, try adding a sprinkle of cinnamon or nutmeg to the cream cheese mixture.
Flavor Variations & Adaptations
Feel free to switch it up! Add a layer of chocolate ganache, a hint of espresso, or even substitute the Biscoff cookies with Oreos for a different yet delightful experience.
Reader Questions & Solutions
-
Q: Can I use low-fat cream cheese?
- A: Yes, although the texture may be a bit lighter, the flavor will still be delicious.
-
Q: What if I don’t have heavy cream?
- A: You can use whipped topping, but the richness will differ.
-
Q: How long can I store these cups?
- A: They stay fresh in the fridge for up to 3 days, but best enjoyed within the first day or two.
-
Q: Can I freeze these cheesecake cups?
- A: Freezing isn’t recommended as the texture may be affected, but you can freeze the cheesecake mixture (without the crushed cookies) and thaw it before layering.
-
Q: Can I make this recipe gluten-free?
- A: Absolutely! Just use gluten-free Biscoff cookies, and you’re all set.
Wrapping Up
There you have it—your key to creating delicious No-Bake Biscoff Cheesecake Cups! This recipe not only illuminates our love for desserts but also reminds us of the joy of cooking and sharing. I hope you enjoy making and indulging in these delectable cups as much as I did. Let the nostalgia and sweetness swirl through your kitchen, and may each bite bring a smile to your face. Happy cooking!
PrintNo-Bake Biscoff Cheesecake Cups
Delight in these creamy, crunchy no-bake cheesecake cups featuring Biscoff cookies for a nostalgic treat.
- Prep Time: 15 minutes
- Cook Time: 15 minutes
- Total Time: 135 minutes
- Yield: 4 servings 1x
- Category: Dessert
- Method: No Bake
- Cuisine: American
- Diet: Vegetarian
Ingredients
- 8 oz cream cheese, softened
- 1/2 cup powdered sugar
- 1 tsp vanilla extract
- 1 cup heavy whipping cream
- 1 cup Biscoff cookies, crushed
- 1/4 cup Biscoff spread
- Extra Biscoff cookies for topping
Instructions
- Cream the Base: In a mixing bowl, beat the softened cream cheese, powdered sugar, and vanilla extract until smooth.
- Whip the Cream: In another bowl, whip the heavy cream until stiff peaks form.
- Fold it All Together: Gently fold the whipped cream into the cream cheese mixture.
- Prepare the Biscoff Layer: Divide the crushed Biscoff cookies into serving cups, layering some at the bottom.
- Assemble the Cheesecake Mixture: Spoon the cheesecake mixture over the cookie layer.
- Drizzle and Garnish: Drizzle Biscoff spread on top and add more crushed cookies as a garnish.
- Chill and Set: Refrigerate for at least 2 hours before serving.
Notes
Ensure your cream cheese is at room temperature for a smooth mixture. Leftovers can be stored in an airtight container for up to 3 days.
Nutrition
- Serving Size: 1 cup
- Calories: 320
- Sugar: 15g
- Sodium: 180mg
- Fat: 22g
- Saturated Fat: 12g
- Unsaturated Fat: 8g
- Trans Fat: 0g
- Carbohydrates: 30g
- Fiber: 1g
- Protein: 5g
- Cholesterol: 30mg