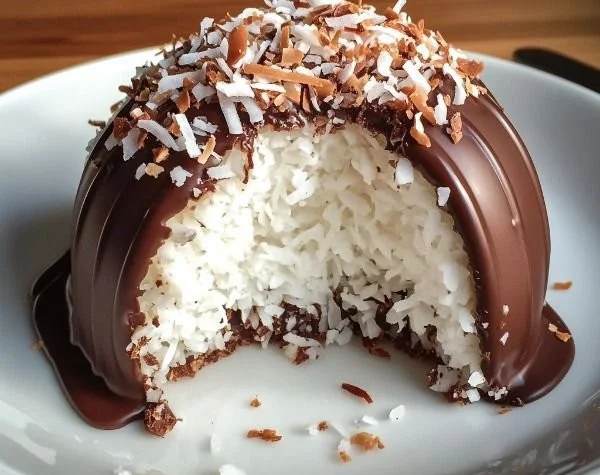
As I stood in the kitchen, the sun pouring through the window, I felt a wave of nostalgia wash over me. Memories of tropical beaches and vibrant sunsets danced in my mind, igniting my desire to recreate those blissful moments. It was then that I realized I was missing a special treat that perfectly encapsulated that feeling of paradise: a Coconut Dome with Chocolate. The creamy, dreamy coconut layered with rich chocolate not only satisfied my sweet tooth but also whisked me away to sun-soaked shores.
There’s something enchanting about coconut. Whether it’s in a piña colada or a delicate dessert, the flavor transports you to a place of warmth and relaxation. And what better companion for coconut than chocolate? Together, they create a dessert that is both indulgent and refreshing – a blissful harmony that feels like a celebration of summer in every bite.
Recipe Timing
- Prep Duration: 20 minutes
- Active Cooking: 10 minutes
- Total Duration: 1 hour 50 minutes (including chilling and freezing)
- Portion Size: 8 servings
- Complexity: Simple
Nutritional Recipe
- Calories per portion: 200
- Protein: 2 grams per serving
- Carbs: 24 grams per serving
- Fats: 12 grams per serving
- Fiber: 3 grams per serving
- Sugars: 10 grams per serving
- Sodium: 15 mg per serving
Why You’ll Love This Coconut Dome with Chocolate
This Coconut Dome with Chocolate isn’t just a treat; it’s an experience! The combination of flavors and textures is astounding. Your palate will enjoy the soft, luscious coconut filling surrounded by a crisp chocolate shell. Plus, it’s surprisingly easy to make! With no baking involved, it’s a no-fuss dessert that impresses guests and satisfies cravings. Ideal for summer gatherings, picnics, or even a cozy family dinner, this dessert promises to be a showstopper.
The Complete Cooking Journey
Making your own Coconut Dome with Chocolate is straightforward and enjoyable. You’ll find that each step carries a sense of anticipation as the flavors develop and come together. I promise, the moment your family or friends take their first bite, you’ll find joy in their smiles.
Ingredients:
- 1 cup coconut cream
- 1/4 cup powdered sugar
- 1 teaspoon vanilla extract
- 1 cup chocolate chips
- 1 tablespoon coconut oil
- 2 cups shredded coconut
Method:
Step 1: Prepare the Coconut Mixture
In a bowl, mix coconut cream, powdered sugar, and vanilla extract until smooth. The cream should whip together like a soft dream, with a delightful aroma wafting into the air.
Step 2: Chill for a Perfect Consistency
Chill the coconut mixture in the refrigerator for 30 minutes. This will allow the mixture to firm up slightly, creating an ideal texture for filling your molds.
Step 3: Melt the Chocolate
Melt chocolate chips and coconut oil together in a microwave-safe bowl, stirring until smooth. Keep an eye on it, as the chocolate melts quickly and should be glossy and homogeneous.
Step 4: Mold the Chocolate Coating
Coat silicone dome molds with melted chocolate, then let it set in the fridge until firm. Be generous; this will ensure a delightful crunch when your guests take their first bite!
Step 5: Fill and Layer
Fill the chocolate-coated molds with the chilled coconut mixture, then cover with more melted chocolate. This ensures an even layer of chocolate coats the delightful filling.
Step 6: Freeze for Deliciousness
Freeze for at least 1 hour to set. This step is worth the wait—the anticipation will build, and the finished product is so rewarding!
Step 7: Serve with Joy
Once set, carefully remove the domes from the molds and serve. Take a moment to appreciate your creation—this is where your hard work pays off!
Serving Suggestions & Pairings
This Coconut Dome with Chocolate pairs beautifully with a fruity salad or a scoop of tropical sorbet. You can also serve it alongside a nice cup of espresso for a delightful coffee and dessert combo. Don’t forget to garnish with fresh mint leaves or toasted coconut flakes for an extra touch of charm!
Storage & Leftovers Guide
If you happen to have any Coconut Domes left, place them in an airtight container and store them in the freezer. They can last for up to a month! Just remember to let them thaw for a few minutes at room temperature before serving so they regain that dreamy texture.
Kitchen Wisdom & Success Tips
- For best results, use full-fat coconut cream to ensure the right creaminess.
- Don’t skip the chilling steps—they help the flavors meld and create that luxurious texture.
- If you’re using a different type of mold, just make sure it’s silicone to make removing the domes easier.
Flavor Variations & Adaptations
Don’t be afraid to get creative! You could add a bit of lime zest to the coconut mixture for a zesty twist or sprinkle in some chopped nuts for added crunch. If you’re feeling adventurous, drizzle some caramel on top for a delightful combination of flavors!
Reader Questions & Solutions
-
Can I use sweetened coconut instead of unsweetened?
- Yes, just reduce the powdered sugar slightly if you want to control the sweetness.
-
What if I don’t have silicone molds?
- You can use paper muffin liners; just carefully remove the liners once the domes are set.
-
Can I substitute chocolate chips?
- Absolutely! You can use any high-quality chocolate, or even white chocolate for a twist.
-
How can I make this dairy-free?
- The recipe is already dairy-free, making it perfect for those with dietary restrictions!
-
Is there a way to make it vegan?
- Yes! Ensure the chocolate chips are dairy-free, and you’re good to go.
Wrapping Up
Creating a Coconut Dome with Chocolate is not just about a delicious dessert; it’s about the experience, the memories, and the joy of sharing with loved ones. So, roll up your sleeves, channel your inner tropical spirit, and let this delightful recipe bring a slice of paradise to your kitchen. I promise you won’t regret it; your tastebuds will thank you! Happy cooking!