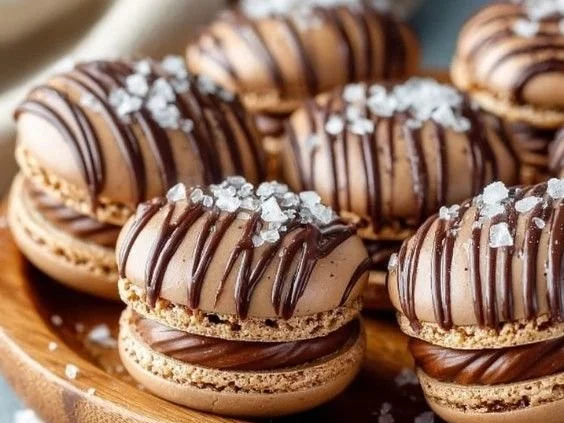
There’s something magical about homemade macarons. The way they look—glossy, delicate, and colorful—along with that delightful crunch followed by a soft chewy interior, makes them the epitome of a perfect treat. And when you step it up a notch with the irresistible flavors of Ferrero Rocher, you create an experience unlike any other. Recently, I attempted these beautiful Ferrero Rocher macarons, inspired by childhood memories of indulging in those shiny, nut-covered chocolates. The first time I bit into one, I was transported—it’s like a luxurious bite of delight that brings a smile to anyone’s face.
If you’ve ever been curious about making macarons at home, this is the perfect recipe to start with! Not only is the taste incredible, but the satisfaction of creating such a chic dessert from scratch is unbeatable. So, let’s dive into the delightful journey of making these Ferrero Rocher macarons!
Recipe Timing
- Prep Duration: 1 hour
- Active Cooking: 30 minutes
- Total Duration: 24 hours (including chilling)
- Portion Size: About 20 macarons
- Complexity: Moderate
Nutritional Recipe
- Calories per portion: Approximately 120 calories
- Protein: 2g per serving
- Carbs: 12g per serving
- Fats: 7g per serving
- Fiber: 1g per serving
- Sugars: 8g per serving
- Sodium: 25mg per serving
Why You’ll Love This Ferrero Rocher Macarons
These macarons are not just visually stunning; they also pack a punch of flavor with the rich combination of chocolate, hazelnuts, and a creamy filling reminiscent of the beloved Ferrero Rocher chocolates. Each bite is a journey through that crunch you crave, complete with a crumbly exterior and luscious ganache in the center. Perfect for a special occasion or simply indulging your taste buds on a quiet afternoon, these macarons will impress friends and family alike!
The Complete Cooking Journey
Baking macarons might seem daunting at first, but when you break it down step by step, it’s a wonderfully rewarding process. You’ll harness the power of egg whites, sugar, and almond flour, transforming them into the gorgeous little shells that will cradle your velvety chocolate-hazelnut ganache.
Now, let’s get started!
Ingredients:
- 120g almond flour
- 120g powdered sugar
- 100g egg whites (about 3 large eggs)
- 30g granulated sugar
- 30g cocoa powder
- 1/2 cup chocolate-hazelnut spread (like Nutella)
- 1/2 cup heavy cream
- 1 tsp vanilla extract
- Pinch of salt
- Gold dust (optional, for decoration)
Method:
Step 1: Preheat Your Oven
Preheat your oven to 300°F (150°C) and line two baking sheets with parchment paper.
Step 2: Sift Dry Ingredients
In a bowl, sift together the almond flour, powdered sugar, and cocoa powder; set aside for later.
Step 3: Whip Egg Whites
In a separate, clean bowl, whip the egg whites until soft peaks form. Gradually add the granulated sugar and continue to whip until stiff peaks form and the mixture is glossy.
Step 4: Combine Dry and Wet Ingredients
Gently fold the dry ingredients into the meringue until just combined. Be careful not to over-mix, as we want to keep that airy texture.
Step 5: Pipe the Batter
Transfer the batter to a piping bag fitted with a round tip. Pipe small rounds onto the prepared baking sheets, leaving some space between each one.
Step 6: Release Air Bubbles
Tap the baking sheets lightly on the counter to release any trapped air bubbles and let the macaron shells sit for about 30-60 minutes until they form a skin on top.
Step 7: Bake the Macarons
Bake for 15-20 minutes, then let them cool completely on the sheets.
Step 8: Prepare the Filling
For the filling, heat the heavy cream until just simmering. Pour it over the chocolate-hazelnut spread, stir until smooth, and let it cool to thicken.
Step 9: Assemble the Macarons
Pipe the ganache onto the flat side of one macaron and sandwich it with another, creating a delightful little package of joy.
Step 10: Add a Touch of Glam
Optionally, dust with gold for an elegant finish. This step not only enhances the visual appeal but also adds a hint of luxury to your delightful treats.
Step 11: Rest for Flavor
Let the assembled macarons sit in the refrigerator for 24 hours to develop flavor before serving. This patience truly pays off!
Serving Suggestions & Pairings
These Ferrero Rocher macarons shine on their own but pair beautifully with coffee or tea. A scoop of vanilla ice cream would be delightful alongside them too, creating a transportive dessert experience.
Storage & Leftovers Guide
Store any leftover macarons in an airtight container in the refrigerator for up to five days. To enjoy them at their best, allow them to come to room temperature before serving.
Kitchen Wisdom & Success Tips
- Fresh ingredients are key to successful macarons. Ensure your egg whites are at room temperature for optimal results.
- Be precise with measurements—baking is a science!
- If your macarons don’t rise or crack, consider checking your oven temperature as it may be running hot or cold.
Flavor Variations & Adaptations
If you want to play with flavors, consider adding an espresso powder to the cocoa for a coffee twist or swirling in a hint of orange zest for a citrusy punch.
Reader Questions & Solutions
-
Why did my macarons crack?
Cracking is often due to excess humidity or a too-hot oven. Ensure your oven temperature is accurate and use a dehumidifier if your kitchen is particularly humid. -
How do I fix over-mixed batter?
If you mix too long, it may become too runny. Unfortunately, there isn’t a fix, but for next time, mix until just combined. -
Can I use egg substitutes?
Traditional macarons require egg whites for structure, but aquafaba (chickpea water) can be an egg replacement for a vegan option. -
What can I do if my macarons don’t have a "foot"?
Ensure you tap them on the counter to release air bubbles and allow them to rest before baking to form a proper skin. -
Can I freeze macarons?
Yes, you can freeze macarons in an airtight container for up to three months. Thaw completely before serving for the best texture.
Wrapping Up
Creating these Ferrero Rocher macarons is a journey well worth taking. The blend of textures and flavors brings joy with every bite. So gather your ingredients, don your apron, and let the sweet aromas fill your kitchen as you embark on this delightful adventure. And remember, the satisfaction of sharing your homemade creations with loved ones is the most rewarding part of baking. Happy baking!