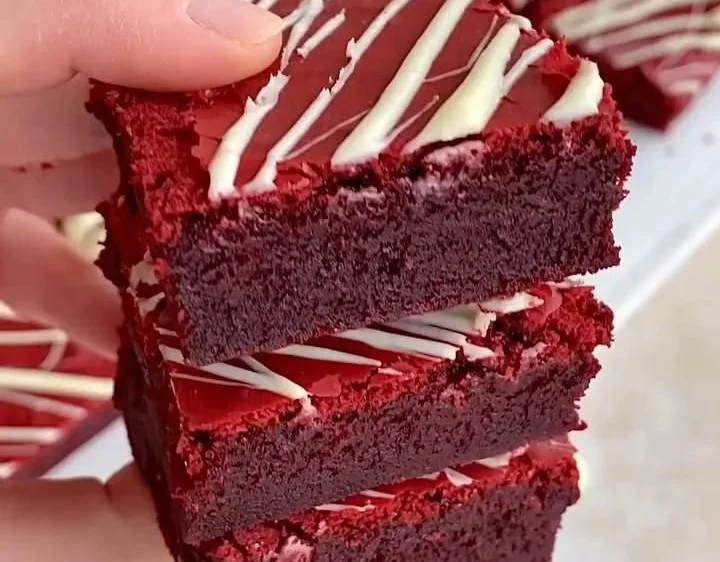
There’s something utterly enchanting about the color red when it comes to desserts. It’s vibrant, bold, and exudes joy. I still remember the first time I tasted a red velvet treat—my heart raced with excitement as I savored the rich flavor and the soft, velvety texture. Red velvet cake was always a showstopper at birthday celebrations, and now, we’ve taken that alluring essence and turned it into something even more indulgent: Red Velvet Brownies. These delectable, fudgy squares bring together the best of both worlds—the classic chocolate brownie and the sweet, tangy mischievous nature of red velvet. With creamy white chocolate drizzled on top, these brownies are not just a dessert; they’re an experience.
Recipe Timing
- Prep Duration: 15 minutes
- Active Cooking: 25 minutes
- Total Duration: 40 minutes
- Portion Size: 16 brownies
- Complexity: Simple
Nutritional Recipe
- Calories per portion: 150 kcal
- Protein: 2 g per serving
- Carbs: 20 g per serving
- Fats: 7 g per serving
- Fiber: 0.5 g per serving
- Sugars: 10 g per serving
- Sodium: 120 mg per serving
Why You’ll Love This Red Velvet Brownies
These Red Velvet Brownies are the ultimate sweet treat that combines the deep flavors of cocoa with the unique taste of buttermilk and a splash of red food coloring for that classic look. The chewy texture will melt in your mouth, while the drizzle of white chocolate adds a creamy finish that will have your taste buds dancing with delight. They’re perfect for celebrations, cozy evenings at home, or simply a quick fix to satisfy your sweet tooth. Plus, they’re super easy to whip up, making them a glorious go-to when you’re in a baking mood!
The Complete Cooking Journey
Every baking adventure begins with a few key steps that, when combined, lead to glorious results. With just a handful of ingredients, we’re on our way to creating a show-stopping dessert. Here’s how to make these rich, fudgy Red Velvet Brownies that will leave everyone asking for seconds.
Ingredients:
- 1 cup all-purpose flour
- 1/2 cup cocoa powder
- 1 cup granulated sugar
- 1/2 cup unsalted butter, melted
- 2 large eggs
- 1/2 cup buttermilk
- 1 tablespoon red food coloring
- 1 teaspoon vanilla extract
- 1/2 teaspoon baking powder
- 1/2 teaspoon baking soda
- 1/4 teaspoon salt
- 1/2 cup white chocolate, for drizzling
Method:
### Step 1: Preheat the Oven and Prepare the Pan
Preheat your oven to 350°F (175°C). Grease a 9×9 inch baking pan to ensure those brownies come out perfectly!
### Step 2: Combine the Dry Ingredients
In a mixing bowl, combine the flour, cocoa powder, baking powder, baking soda, and salt. This will create a dry mixture that ensures even distribution of ingredients.
### Step 3: Mix the Wet Ingredients
In another bowl, whisk together the melted butter and granulated sugar until well-combined and smooth. Add in the eggs, buttermilk, red food coloring, and vanilla extract, continuing to mix until everything is incorporated.
### Step 4: Combine Wet and Dry Ingredients
Gradually add the dry ingredient mixture to the wet ingredients. Mix until just combined—be careful not to overmix, as this can affect the texture of your brownies.
### Step 5: Pour and Spread the Batter
Pour the brownie batter into the prepared baking pan and spread it evenly. Get ready for your kitchen to start smelling divine!
### Step 6: Bake to Perfection
Bake for 20-25 minutes or until a toothpick inserted into the center comes out clean. Keep an eye on them to prevent overbaking; perfectly gooey brownies are what we’re aiming for!
### Step 7: Cool and Drizzle
Allow the brownies to cool in the pan before drizzling melted white chocolate over the top. Once drizzled, slice into squares and prepare to be amazed!
Serving Suggestions & Pairings
These Red Velvet Brownies are heavenly on their own but pair beautifully with scoops of vanilla ice cream or a dollop of freshly whipped cream. If you’re feeling decadent, serve them with a drizzle of chocolate sauce or alongside a raspberry coulis for a fruity twist. They also make for a stunning centerpiece on dessert tables, especially during holidays or celebrations.
Storage & Leftovers Guide
To keep these brownies fresh, store them in an airtight container at room temperature for up to 3 days. If you’d like to keep them longer, they can be refrigerated for up to a week. You can also freeze them for up to 2 months; just make sure to wrap them tightly to prevent freezer burn.
Kitchen Wisdom & Success Tips
- Use Room Temperature Ingredients: Ensuring that your eggs and buttermilk are at room temperature helps achieve the best texture.
- Don’t Skip the Buttermilk: It adds a delicious tanginess that balances the sweetness, creating that traditional red velvet flavor.
- Watch the Baking Time: Overbaking can lead to dry brownies. Start checking them at the 20-minute mark.
Flavor Variations & Adaptations
Want to mix it up? Consider incorporating mini chocolate chips or chopped nuts into the batter for added texture. You could also try different colorings for fun holiday themes—imagine pastel shades for Easter!
Reader Questions & Solutions
- What if I don’t have buttermilk? You can make a quick substitute with one cup of milk mixed with a tablespoon of vinegar or lemon juice.
- Can I use oil instead of butter? Yes! Use the same amount of vegetable or canola oil for a slightly lighter brownie.
- What kind of cocoa powder should I use? Unsweetened cocoa powder works best; Dutch-processed would also add a rich flavor.
- How can I make these gluten-free? Substitute the all-purpose flour with a 1:1 gluten-free baking mix.
- How do I know when my brownies are done? Look for a toothpick test; you want it to come out with a few moist crumbs, not wet batter.
Wrapping Up
These Red Velvet Brownies are not just a treat – they’re a celebration in every bite. With their rich flavor, delightful texture, and that irresistible pop of color, they’re sure to bring joy to any gathering or cozy night in. So, roll up your sleeves, gather your ingredients, and get ready to indulge in a baking adventure that’s as fun to make as it is to eat. Happy baking!
PrintRed Velvet Brownies

Delicious and fudgy red velvet brownies with a creamy white chocolate drizzle, perfect for celebrations or a sweet treat.
- Prep Time: 15 minutes
- Cook Time: 25 minutes
- Total Time: 40 minutes
- Yield: 16 brownies 1x
- Category: Dessert
- Method: Baking
- Cuisine: American
- Diet: Vegetarian
Ingredients
- 1 cup all-purpose flour
- 1/2 cup cocoa powder
- 1 cup granulated sugar
- 1/2 cup unsalted butter, melted
- 2 large eggs
- 1/2 cup buttermilk
- 1 tablespoon red food coloring
- 1 teaspoon vanilla extract
- 1/2 teaspoon baking powder
- 1/2 teaspoon baking soda
- 1/4 teaspoon salt
- 1/2 cup white chocolate, for drizzling
Instructions
- Preheat your oven to 350°F (175°C). Grease a 9×9 inch baking pan.
- Combine the flour, cocoa powder, baking powder, baking soda, and salt in a mixing bowl.
- Whisk together the melted butter and granulated sugar until smooth. Add the eggs, buttermilk, red food coloring, and vanilla extract, mixing until incorporated.
- Gradually add the dry mixture to the wet ingredients. Mix until just combined.
- Pour the brownie batter into the prepared baking pan and spread evenly.
- Bake for 20-25 minutes or until a toothpick comes out clean.
- Allow the brownies to cool in the pan, then drizzle with melted white chocolate and slice into squares.
Notes
Store in an airtight container at room temperature for up to 3 days, or refrigerate for longer storage.
Nutrition
- Serving Size: 1 brownie
- Calories: 150
- Sugar: 10g
- Sodium: 120mg
- Fat: 7g
- Saturated Fat: 4g
- Unsaturated Fat: 2g
- Trans Fat: 0g
- Carbohydrates: 20g
- Fiber: 0.5g
- Protein: 2g
- Cholesterol: 30mg