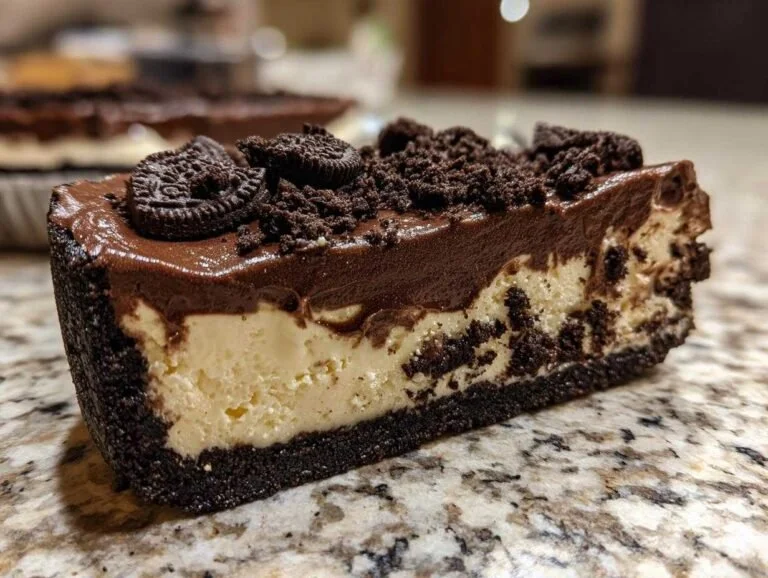
The kitchen is often a sanctuary, a realm where memories are crafted through shared meals and laughter. My earliest memory of baking—or should I say assembling, because who are we kidding here?—is a blissful one involving Oreo cookies. I distinctly remember the joy on my sister’s face when she discovered that our favorite cookies were not just for dunking in milk but could also be transformed into an indulgent, dessert masterpiece. Those experiences, combined with the thrill of no-bake recipes, have led me to share this playful yet utterly delightful Dreamy 8-Minute No-Bake Oreo Pie. Picture this: creamy, dreamy, and rich enough to satisfy even the most discerning sweet tooth—all without the hassle of turning on the oven!
Recipe Timing
- Prep Duration: 8 minutes
- Active Cooking: 0 minutes
- Total Duration: 4 hours (including refrigeration)
- Portion Size: Serves 8
- Complexity: Simple
Nutritional Recipe
- Calories per portion: Approximately 290
- Protein: 3g
- Carbs: 30g
- Fats: 18g
- Fiber: 1g
- Sugars: 15g
- Sodium: 220mg
Why You’ll Love This Dreamy 8-Minute No-Bake Oreo Pie
Right off the bat, it’s clear this pie is a lifesaver for busy schedules. With minimal time investment, you get a rich dessert that tastes like it took hours to create. It’s perfect for gatherings, casual weeknight treats, or when that irresistible Oreo craving strikes. The best part? Each slice is layered with dynamic textures: the crumbly cookie crust, the velvety cream cheese filling, and a sprinkle of crushed Oreos on top that adds that extra crunch. It’s a dessert that not only tastes good but also brings a little joy to your heart with every bite.
The Complete Cooking Journey
## Ingredients:
- 24 Oreo cookies
- 1/4 cup unsalted butter, melted
- 1 package (8 oz) cream cheese, softened
- 1/2 cup powdered sugar
- 1 cup whipped cream
- Additional crushed Oreos for topping
## Method:
Step 1: Crush the Cookies for the Crust
Begin by taking those 24 Oreo cookies and either using a food processor or a rolling pin to crush them into fine crumbs. Mix these delicious crumbs with the melted butter, ensuring every morsel is coated. Press this mixture firmly into the bottom of your pie dish to form a solid crust.
Step 2: Beat the Cream Cheese and Sugar
In a medium bowl, use an electric mixer to beat the softened cream cheese with the powdered sugar until you achieve a smooth and creamy consistency. This is where the magic begins to happen!
Step 3: Fold in Whipped Cream
Now, gently fold in your whipped cream into the cream cheese mixture. Essentially, you want to combine the two without deflating the lightness of the whipped cream—this is where your pie gets its dreamy texture!
Step 4: Pour the Creamy Mixture Over the Crust
Carefully pour the luscious cream cheese filling onto the prepared Oreo crust. Use a spatula to smooth the top for an aesthetically pleasing finish.
Step 5: Garnish with Crushed Oreos
Time to churn up the excitement! Sprinkle additional crushed Oreos on top of your pie for that delicious finish. It not only adds flavor but also a lovely visual appeal.
Step 6: Refrigerate to Set
You’ve done all the hard work now; it’s time to let the pie set. Cover the pie with plastic wrap and place it in the refrigerator for at least 4 hours, or even overnight if you’re planning ahead.
Step 7: Slice and Serve!
Once it’s fully set, take the pie out of the fridge, slice it up, and serve it to your eager friends and family. Watch as smiles spread across their faces with every creamy bite!
Serving Suggestions & Pairings
This pie pairs beautifully with fresh berries or a drizzle of chocolate syrup. For a complete dessert experience, serve it alongside a scoop of vanilla ice cream. It’s also a fantastic addition to potluck dinners or birthday celebrations!
Storage & Leftovers Guide
If you find yourself with any leftovers (which is rare, but hey, it happens), store them in the refrigerator in an airtight container. The pie will keep well for up to 3 days, maintaining that delightful creaminess.
Kitchen Wisdom & Success Tips
- Use Room Temperature Ingredients: For the best blending results, always ensure your cream cheese is at room temperature.
- Perfect for Personalization: Add a splash of vanilla extract or mix in some mini chocolate chips for an extra kick of flavor!
- Don’t Rush the Refrigeration: Letting the pie chill properly is key for achieving the best consistency.
Flavor Variations & Adaptations
If you’re feeling adventurous:
- Mint Oreo Pie: Swap regular Oreos for Mint Oreos for a refreshing twist.
- Peanut Butter Swirl: Fold in some smooth peanut butter into the cream cheese mixture for a nutty flavor.
Reader Questions & Solutions
- How can I make this gluten-free? Use gluten-free Oreo substitutes and check your butter and cream cheese for any hidden gluten.
- What can I use if I don’t have whipped cream? You can replace whipped cream with cool whip or even make a non-dairy whipped topping.
- Can I freeze this pie? Yes! You can freeze it before setting. Just wrap it well and it should last for a month. Thaw in the fridge before serving.
- How can I achieve a stronger chocolate flavor? Add cocoa powder to the cream cheese mixture for a richer taste.
- Is there a dairy-free alternative? You could use dairy-free cream cheese and whipped cream alternatives!
Wrapping Up
In just a few simple steps, you’ve created a stunning pie that is not only delicious but also incredibly easy to make. Everyone will be asking for the recipe, and you can take pride in saying you whipped it up in just 8 minutes! So, gather your ingredients, find a comfy spot in your kitchen, and dive into this dreamy creamy delight today! Happy baking, friends!
PrintDreamy 8-Minute No-Bake Oreo Pie

A quick and easy no-bake Oreo pie that’s creamy, dreamy, and rich, perfect for satisfying any sweet tooth.
- Prep Time: 8 minutes
- Cook Time: 0 minutes
- Total Time: 240 minutes
- Yield: 8 servings 1x
- Category: Dessert
- Method: No-Bake
- Cuisine: American
- Diet: Vegetarian
Ingredients
- 24 Oreo cookies
- 1/4 cup unsalted butter, melted
- 1 package (8 oz) cream cheese, softened
- 1/2 cup powdered sugar
- 1 cup whipped cream
- Additional crushed Oreos for topping
Instructions
- Crush the Oreo cookies into fine crumbs and mix with melted butter. Press into the bottom of a pie dish to form a crust.
- Beat cream cheese and powdered sugar in a bowl until smooth and creamy.
- Gently fold in whipped cream into the cream cheese mixture.
- Pour the cream cheese filling over the crust and smooth the top with a spatula.
- Sprinkle additional crushed Oreos on top for garnish.
- Cover and refrigerate for at least 4 hours to set.
- Slice and serve chilled.
Notes
For best results, use room temperature cream cheese and allow the pie to chill properly before serving.
Nutrition
- Serving Size: 1 slice
- Calories: 290
- Sugar: 15g
- Sodium: 220mg
- Fat: 18g
- Saturated Fat: 9g
- Unsaturated Fat: 7g
- Trans Fat: 0g
- Carbohydrates: 30g
- Fiber: 1g
- Protein: 3g
- Cholesterol: 30mg