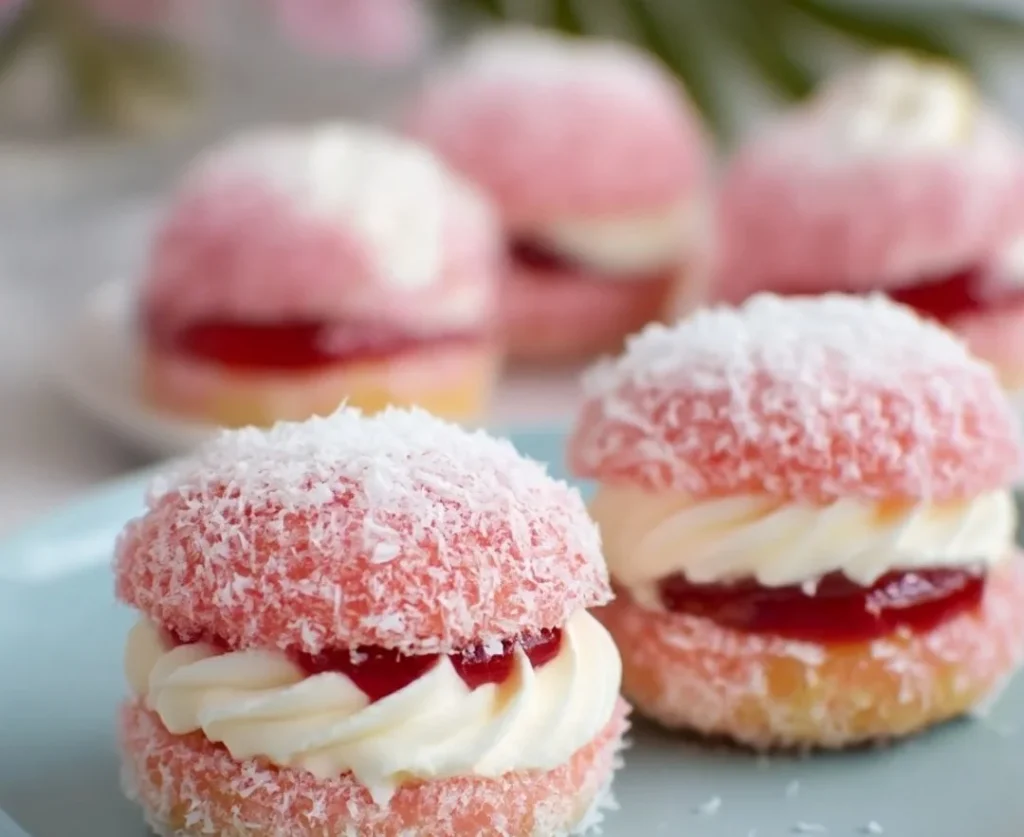
There’s something undeniably charming about vintage recipes, those timeworn treasures that have been lovingly passed down through generations. One such recipe that holds a special place in my heart is the Vintage Australian Pink Jelly Coconut Cakes. These delightful little treats take me back to carefree childhood afternoons spent at my grandmother’s house, where the smell of freshly baked goods filled the air and laughter danced alongside the delightful flavors. The moment I bite into one of these mini masterpieces, I’m transported to those sun-dappled days, my grandmother’s laughter echoing as she shared stories and joy through food. Let’s embark on this nostalgic culinary journey together!
Recipe Timing
- Prep Duration: 15 minutes
- Active Cooking: 20 minutes
- Total Duration: 35 minutes
- Portion Size: Serves 12
- Complexity: Simple
Nutritional Recipe
- Calories per portion: Approx. 165
- Protein: 2g
- Carbs: 22g
- Fats: 8g
- Fiber: 0.5g
- Sugars: 10g
- Sodium: 60mg
Why You’ll Love This Vintage Australian Pink Jelly Coconut Cakes
These Vintage Australian Pink Jelly Coconut Cakes are a perfect blend of nostalgia and sweetness. Each bite offers a lovely contrast between the fluffy cake and the silky raspberry jelly, beautifully enveloped in a layer of desiccated coconut. Not only are they incredibly delicious, but they’re also easy to whip up—perfect for whenever the mood for a treat strikes! Whether you’re hosting a tea party, celebrating a birthday, or simply indulging in a quiet afternoon at home, these delightful cakes are sure to bring smiles and sweet memories.
The Complete Cooking Journey
Making these coconut cakes is not just about the end result; it’s about the joyful process of creating something beautiful. From the very moment you mix butter and sugar, the sweet aroma will ring through your kitchen, while the vibrant pink jelly adds a playful touch. The best part? They look as fabulous as they taste!
Ingredients
- 1 cup plain flour
- 1/2 cup sugar
- 1/2 cup butter, softened
- 2 eggs
- 1/2 cup milk
- 1 teaspoon vanilla extract
- 1 packet raspberry jelly (gelatin)
- 1/2 cup desiccated coconut
- Pinch of salt
Method
Step 1: Preheat the Oven
Preheat the oven to 180°C (350°F). This step ensures that your cakes start baking in ideal conditions for a perfect rise and texture!
Step 2: Prepare the Muffin Tin
Grease and flour a muffin tin to ensure the cakes come out easily once they are baked. This little preparation step can save you much frustration later!
Step 3: Cream Butter and Sugar
In a mixing bowl, cream together the softened butter and sugar until light and fluffy. This airiness is key to achieving a tender, delightful cake.
Step 4: Add Eggs and Vanilla
Beat in the eggs one at a time, making sure each is fully incorporated before adding the next. Then, stir in the fragrant vanilla extract to elevate the cakes’ aromatic profile.
Step 5: Combine Dry and Wet Ingredients
Gradually mix in the flour and a pinch of salt, alternating with milk until the batter is combined. The alternating method helps create a silky smooth batter that beautifully blends all the flavors.
Step 6: Pour into Muffin Tin
Pour the batter evenly into the greased muffin tin. This ensures that each cake will have a uniform size, making them easier to serve and enjoy.
Step 7: Bake
Bake in the preheated oven for 15-20 minutes or until a toothpick inserted in the center comes out clean. This is where the magic truly happens, as your kitchen fills with the smell of freshly baked cakes.
Step 8: Cool Completely
Once baked, allow the cakes to cool completely in the tin for a few minutes before transferring them to a wire rack to cool entirely. This helps to maintain their fluffy texture!
Step 9: Prepare the Jelly
While the cakes cool, prepare the raspberry jelly according to the packet instructions. Allow it to set slightly so that it clings to your cakes perfectly.
Step 10: Coat the Cakes
Dip the tops of each cooled cake into the jelly, then roll in desiccated coconut. This step adds not only flavor but that signature vintage aesthetic that makes these treats so irresistible!
Step 11: Serve and Enjoy
Serve your Vintage Australian Pink Jelly Coconut Cakes with tea or coffee, or simply enjoy them on their own. Feel free to share them with friends, but don’t be surprised if they disappear quickly!
Serving Suggestions & Pairings
These cakes are best enjoyed with a cup of Earl Grey or a refreshing iced tea. They also make a lovely sweet treat for afternoon gatherings or children’s parties, sparking joy with their vibrant colors and delightful flavors.
Storage & Leftovers Guide
Store any leftover cakes in an airtight container at room temperature for up to 3 days. If you have any jelly left, keep it separately in the fridge to enjoy with desserts later on. However, they’re delightful enough that leftovers are often a rarity in my house!
Kitchen Wisdom & Success Tips
- Ensure your butter is softened for easy creaming; this makes a crucial difference in texture.
- When dipping the cakes in jelly, let any excess drip off for a cleaner finish.
- Don’t rush cooling; this prevents the cakes from becoming soggy once dipped.
Flavor Variations & Adaptations
Feel free to play around with flavors! Swap raspberry jelly for strawberry or lemon for a zesty twist, or add some lemon zest to the batter for a refreshing zing. You could even experiment with different coatings, like crushed nuts or sprinkles.
Reader Questions & Solutions
-
What if I don’t have a muffin tin?
You can use a cupcake tray or even bake the batter in a square pan and cut them into squares! -
Can I use a different type of yogurt instead of milk?
Yes, yogurt works well and adds extra moisture; just thin it down with a little water if it’s too thick. -
How do I make these gluten-free?
Substitute the plain flour with a gluten-free flour blend, ensuring it includes a binding agent. -
Can I store these in the fridge?
Yes, but be mindful that the jelly coating may become sticky. Just let them come to room temperature before serving. -
What if my jelly doesn’t set?
Try cooling it in the fridge for a faster setting time, or ensure that the jelly was dissolved thoroughly before cooling.
Wrapping Up
There you have it—vintage Australian pink jelly coconut cakes that are not just a treat but a tiny window into the past, filled with warmth and memory. Cooking these delightful cakes isn’t just about the end product; it’s about rediscovering joy in the kitchen, embracing the process, and sharing love through food. So, roll up your sleeves, grab those ingredients, and let’s create some sweet memories together! Enjoy every bite and all the happy moments that come with them. Happy baking!
PrintVintage Australian Pink Jelly Coconut Cakes

Delightful mini cakes with a nostalgic twist, featuring fluffy cake topped with raspberry jelly and desiccated coconut.
- Prep Time: 15 minutes
- Cook Time: 20 minutes
- Total Time: 35 minutes
- Yield: 12 servings 1x
- Category: Dessert
- Method: Baking
- Cuisine: Australian
- Diet: Vegetarian
Ingredients
- 1 cup plain flour
- 1/2 cup sugar
- 1/2 cup butter, softened
- 2 eggs
- 1/2 cup milk
- 1 teaspoon vanilla extract
- 1 packet raspberry jelly (gelatin)
- 1/2 cup desiccated coconut
- Pinch of salt
Instructions
- Preheat the oven to 180°C (350°F).
- Grease and flour a muffin tin.
- Cream together the softened butter and sugar until light and fluffy.
- Beat in the eggs one at a time, then stir in the vanilla extract.
- Mix in the flour and salt alternately with milk until the batter is combined.
- Pour the batter into the greased muffin tin.
- Bake for 15-20 minutes or until a toothpick comes out clean.
- Cool the cakes in the tin for a few minutes, then transfer to a wire rack.
- Prepare raspberry jelly according to packet instructions and let it set.
- Dip the cooled cakes into the jelly, then roll in desiccated coconut.
- Serve your cakes with tea or coffee, or enjoy them on their own.
Notes
Store leftovers in an airtight container at room temperature for up to 3 days. Leftover jelly can be kept in the fridge for later desserts.
Nutrition
- Serving Size: 1 serving
- Calories: 165
- Sugar: 10g
- Sodium: 60mg
- Fat: 8g
- Saturated Fat: 5g
- Unsaturated Fat: 3g
- Trans Fat: 0g
- Carbohydrates: 22g
- Fiber: 0.5g
- Protein: 2g
- Cholesterol: 40mg