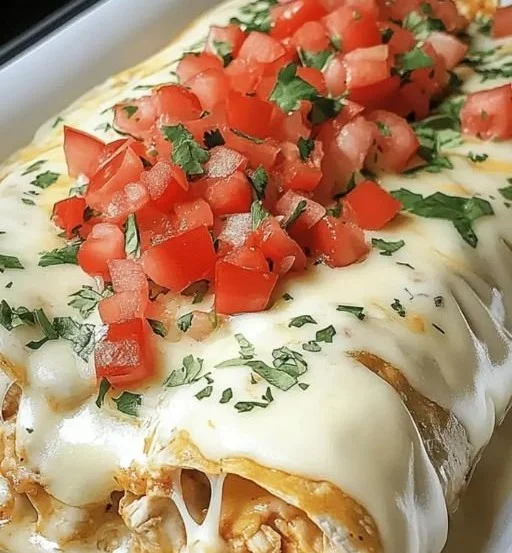
There’s nothing quite like the cozy, inviting aroma of a cheesy casserole baking away in the oven, inviting you to gather around the dinner table with family and friends. As a food blogger, I find my inspiration often manifests in moments spent in my kitchen, where memories are made, and delicious meals come to life. One such standout dish that holds a special place in my heart is Creamy Queso Chicken Enchiladas. The combination of creamy sauce, tender chicken, and cheesy goodness enveloped in warm tortillas transports me straight to the heart of Mexico, reminding me of vibrant gatherings filled with laughter, love, and unforgettable flavors.
Recipe Timing
- Prep Duration: 15 minutes
- Active Cooking: 30 minutes
- Total Duration: 45 minutes
- Portion Size: Serves 4-6
- Complexity: Simple
Nutritional Recipe
- Calories per portion: Approximately 450 kcal
- Protein: 30 grams
- Carbs: 40 grams
- Fats: 22 grams
- Fiber: 3 grams
- Sugars: 2 grams
- Sodium: 800 mg
Why You’ll Love This Creamy Queso Chicken Enchiladas
These Creamy Queso Chicken Enchiladas are a celebration of taste and comfort. Each bite is a harmonious blend of textures—from the creamy filling to the slight chew of the tortillas—making them a hit for everyone at the table. Perfect for busy weeknights or a laid-back weekend dinner, this dish requires minimal effort but delivers maximum satisfaction. Simply put, comfort food should be this delicious!
The Complete Cooking Journey
Join me as we embark on this delicious journey! Our adventure starts with fresh ingredients and ends with a bubbling, cheesy masterpiece fresh from the oven. So, grab your apron, and let’s make some enchiladas that will warm your heart—and your home!
Ingredients:
- 2 cups cooked shredded chicken
- 1 cup cream cheese
- 1 cup queso dip
- 8 flour tortillas
- 1 cup shredded cheese (cheddar or Mexican blend)
- 1/2 cup diced onions
- 1 can diced green chilies
- Salt and pepper to taste
- Chopped cilantro for garnish
Method:
Step 1: Preheat the Oven
Preheat your oven to 350°F (175°C) to prepare it for that bubbling batch of enchiladas.
Step 2: Create the Filling Mix
In a large bowl, combine the cooked shredded chicken, cream cheese, queso dip, diced onions, and diced green chilies. Stir until everything is well blended and creamy.
Step 3: Season to Perfection
Season the mixture with salt and pepper to taste, making sure it’s just right for your palate.
Step 4: Assemble the Enchiladas
Spoon a generous portion of the chicken mixture into each tortilla and roll it up gently but firmly.
Step 5: Arrange in the Baking Dish
Place the rolled tortillas seam-side down in a greased baking dish, packing them in for a cozy fit.
Step 6: Drizzle with Queso
Pour additional queso dip over the top of the rolled tortillas, ensuring each one gets a nice layer of creamy goodness.
Step 7: Sprinkle with Cheese
Top everything off with a generous sprinkle of shredded cheese, ready for melting.
Step 8: Bake to Cheesy Perfection
Bake for 25-30 minutes or until the cheese is melted and bubbly, filling your kitchen with an irresistible aroma.
Step 9: Final Touches
Garnish with chopped cilantro and serve warm for a delightful meal that is sure to impress.
Serving Suggestions & Pairings
These Creamy Queso Chicken Enchiladas are perfect on their own but shine even brighter with a side of fresh guacamole, tangy salsa, or a crisp green salad. A dollop of sour cream adds a cool contrast that balances the richness beautifully. Consider pairing them with a refreshing margarita for an authentic Mexican dining experience.
Storage & Leftovers Guide
Leftover enchiladas can be stored in an airtight container in the fridge for up to 3 days. For longer storage, they freeze beautifully! Wrap them tightly, and they’ll stay delicious for up to 2 months. Just reheat gently in the oven when you’re ready to enjoy them again.
Kitchen Wisdom & Success Tips
- Rotisserie Chicken: Save time by using store-bought rotisserie chicken for an incredibly quick assembly.
- Make Ahead: You can prepare these enchiladas the night before, pop them in the fridge, and just bake them when it’s time to eat.
- Extra Spice: For those who like a kick, feel free to add your favorite hot sauce or some chopped jalapeños to the filling.
Flavor Variations & Adaptations
Feel free to customize your enchiladas! Swap the shredded chicken for black beans or ground turkey, or switch up the cheese for something extra fancy like pepper jack. Vegetarian? Load them up with peppers, mushrooms, and corn for a vibrant veggie version.
Reader Questions & Solutions
-
Can I use whole wheat tortillas instead?
- Absolutely! Whole wheat tortillas will give a nutty flavor and are a healthier alternative.
-
What if I don’t have queso dip?
- No problem! You can substitute with more cream cheese and shredded cheese, adding a splash of milk for creaminess.
-
Can I prepare the filling ahead of time?
- Yes! Prepare the filling a day in advance, store it in the fridge, and assemble when you’re ready to bake.
-
How do I prevent the tortillas from cracking?
- Warm the tortillas briefly in the microwave or on a dry skillet to make them more pliable before filling and rolling.
-
What side dish would go well with this?
- A fresh corn salad or a simple cucumber and tomato salad would complement the richness of enchiladas beautifully.
Wrapping Up
So there you have it—a comforting dish bursting with flavor, perfect for gatherings or cozy nights in. These Creamy Queso Chicken Enchiladas have the power to bring everyone together, curating moments that linger long after the last bite. I hope you feel inspired to create your own batch, and may every roll you make hold the promise of joy and satisfaction. Happy cooking!
PrintCreamy Queso Chicken Enchiladas

A delightful blend of creamy sauce and tender chicken wrapped in warm tortillas, perfect for gatherings and cozy meals.
- Prep Time: 15 minutes
- Cook Time: 30 minutes
- Total Time: 45 minutes
- Yield: 4-6 servings 1x
- Category: Main Course
- Method: Baking
- Cuisine: Mexican
- Diet: Gluten-Free, Optionally Vegetarian
Ingredients
- 2 cups cooked shredded chicken
- 1 cup cream cheese
- 1 cup queso dip
- 8 flour tortillas
- 1 cup shredded cheese (cheddar or Mexican blend)
- 1/2 cup diced onions
- 1 can diced green chilies
- Salt and pepper to taste
- Chopped cilantro for garnish
Instructions
- Preheat your oven to 350°F (175°C) to prepare it for that bubbling batch of enchiladas.
- Combine the cooked shredded chicken, cream cheese, queso dip, diced onions, and diced green chilies in a large bowl. Stir until everything is well blended and creamy.
- Season the mixture with salt and pepper to taste, making sure it’s just right for your palate.
- Spoon a generous portion of the chicken mixture into each tortilla and roll it up gently but firmly.
- Place the rolled tortillas seam-side down in a greased baking dish, packing them in for a cozy fit.
- Pour additional queso dip over the top of the rolled tortillas, ensuring each one gets a nice layer of creamy goodness.
- Top everything off with a generous sprinkle of shredded cheese, ready for melting.
- Bake for 25-30 minutes or until the cheese is melted and bubbly, filling your kitchen with an irresistible aroma.
- Garnish with chopped cilantro and serve warm for a delightful meal that is sure to impress.
Notes
These enchiladas can be made ahead of time and stored in the fridge or freezer for later enjoyment. Pair with guacamole, salsa, or a green salad for a complete meal.
Nutrition
- Serving Size: 1 serving
- Calories: 450
- Sugar: 2g
- Sodium: 800mg
- Fat: 22g
- Saturated Fat: 10g
- Unsaturated Fat: 8g
- Trans Fat: 0g
- Carbohydrates: 40g
- Fiber: 3g
- Protein: 30g
- Cholesterol: 80mg