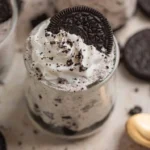
There’s something incredibly nostalgic about Oreos. For many of us, these delightful cookies were a staple of our childhood, perfect for dunking in milk after school or sharing with friends during sleepovers. But as I grew older, I started to think outside the box (or cookie package) and realized the true potential of these little black-and-white wonders. This inspired me to create something that would make the most of their rich flavor and satisfying crunch—a no-bake cheesecake that’s just as fun as it is delicious! Enter: Oreo No-Bake Cheesecake Cups.
These individual servings of creamy, dreamy cheesecake, layered with Oreo goodness, are an absolute crowd-pleaser. They are perfect for parties, summer barbecues, or simply as a sweet treat to enjoy in your cozy kitchen, all without the need to turn on the oven. The combination of smooth cream cheese, sweet whipped cream, and crunchy Oreo layers is simply irresistible. So, gather your ingredients, and let’s dive into this delightful dessert adventure!
Recipe Timing
- Prep Duration: 20 minutes
- Active Cooking: 15 minutes
- Total Duration: 2 hours 20 minutes (includes chilling time)
- Portion Size: Serves 6-8 cups (depending on cup size)
- Complexity: Simple
Nutritional Recipe
- Calories per portion: Approximately 360
- Protein: 4g per serving
- Carbs: 32g per serving
- Fats: 24g per serving
- Fiber: 1g per serving
- Sugars: 18g per serving
- Sodium: 180mg per serving
Why You’ll Love This Oreo No-Bake Cheesecake Cups
Why do we love these little cheesecake cups so much? It’s a pure combination of nostalgia and innovation. Each bite is a journey through textures—from the crunchy chocolate cookie crust to the velvety cheesecake filling. Plus, there’s no baking involved, making it approachable for bakers and non-bakers alike! These cups are not only visually appealing but also allow portion control, so you can indulge without going overboard. Great for gatherings or a sweet treat just for yourself!
The Complete Cooking Journey
Ah, the joy of crafting desserts! Ready to embark on this easy, no-bake journey? The process brings you simple steps that result in a satisfying masterpiece that rivals the best cheesecakes out there. Plus, let’s be honest—they look oh-so-pretty ready to be served.
Ingredients:
- 20 Oreo cookies, crushed
- 1/2 cup unsalted butter, melted
- 8 oz cream cheese, softened
- 1/2 cup powdered sugar
- 1 tsp vanilla extract
- 1 cup heavy whipping cream
- 12 Oreo cookies, chopped (for layering)
Method:
Step 1: Create the Oreo Crust
In a bowl, combine crushed Oreos and melted butter. Mix until the cookies are thoroughly coated. Press this mixture firmly into the bottom of your serving cups to create a delicious crust.
Step 2: Whip the Cream Cheese Mixture
In a mixing bowl, beat the softened cream cheese until smooth and creamy. Add powdered sugar and vanilla, mixing until well combined and luscious.
Step 3: Whip the Cream
In another bowl, whip the heavy cream until stiff peaks form. This is where the magic happens—fluffy clouds of cream that will lighten up your cheesecake mixture.
Step 4: Fold in the Whipped Cream
Gently fold the whipped cream into the cream cheese mixture. Take your time with this step—you’re folding in air to create that fabulous lightness we all crave in a cheesecake!
Step 5: Layer It Up
Layer the cheesecake mixture over the Oreo crust you’ve created, followed by a layer of chopped Oreos. The contrast of flavors and textures is what makes this dessert so special.
Step 6: Refrigerate and Set
Repeat the layers until your cups are filled, then finish with a dollop of whipped cheesecake on top. Pop these beauties in the refrigerator for at least 2 hours before serving. The wait is totally worth it!
Serving Suggestions & Pairings
Serve these Oreo No-Bake Cheesecake Cups with a drizzle of chocolate sauce or a sprinkle of cocoa powder for extra flair. Pair them with a hot cup of coffee or a tall glass of cold milk—your taste buds will thank you!
Storage & Leftovers Guide
These cheesecake cups can be stored in the refrigerator for up to 4 days! They’re best enjoyed chilled, so just keep them covered to maintain their freshness. I recommend consuming them within a couple of days for optimal flavor and texture.
Kitchen Wisdom & Success Tips
- Make it ahead: These cups are perfect for making a day in advance, saving you stress on the day of your event.
- Mix it up: Feel free to substitute in different cookie flavors—try it with gluten-free Oreos or even chocolate mint cookies for a twist!
- Use room temperature ingredients: This helps create a smooth filling without lumps.
Flavor Variations & Adaptations
You can easily switch up this recipe! Try adding a layer of peanut butter between the Oreo crust and cheesecake for a sinful twist, or fold in some crushed berries for a fruity variation. The possibilities are endless!
Reader Questions & Solutions
-
What if I can’t find heavy cream?
You can use a whipped topping or a combination of milk and butter as a substitute, though it won’t be as rich. -
Can I use low-fat cream cheese?
Yes, low-fat cream cheese will work fine, but the texture may not be as creamy and rich. -
How do I prevent my Oreo crust from crumbling?
Ensure that you press it firmly into the bottom of the cups and use enough melted butter to hold the crumbs together. -
Is there a dairy-free option?
Definitely! You can substitute with vegan cream cheese and coconut cream for a dairy-free version. -
Can I freeze these cheesecake cups?
While I don’t recommend freezing, you can keep them in the freezer for a short time. Don’t forget to thaw in the fridge before serving!
Wrapping Up
So there you have it—Oreo No-Bake Cheesecake Cups that are not just easy to make but also a delightful treat you’ll want to share with everyone you know. Whether it’s a gathering or a cozy night in, these cups deliver happiness in every bite. Embrace your culinary creativity, play with different flavors, and, most importantly, enjoy every delicious moment you spend in the kitchen! Happy baking (or rather, no-baking)!
PrintOreo No-Bake Cheesecake Cups
Delightful no-bake cheesecake cups layered with Oreo goodness, perfect for parties or a sweet treat.
- Prep Time: 20 minutes
- Cook Time: 15 minutes
- Total Time: 140 minutes
- Yield: 6-8 cups 1x
- Category: Dessert
- Method: No-Bake
- Cuisine: American
- Diet: Vegetarian
Ingredients
- 20 Oreo cookies, crushed
- 1/2 cup unsalted butter, melted
- 8 oz cream cheese, softened
- 1/2 cup powdered sugar
- 1 tsp vanilla extract
- 1 cup heavy whipping cream
- 12 Oreo cookies, chopped (for layering)
Instructions
- Create the Oreo Crust: In a bowl, combine crushed Oreos and melted butter. Mix until the cookies are thoroughly coated. Press this mixture firmly into the bottom of your serving cups to create a delicious crust.
- Whip the Cream Cheese Mixture: In a mixing bowl, beat the softened cream cheese until smooth and creamy. Add powdered sugar and vanilla, mixing until well combined and luscious.
- Whip the Cream: In another bowl, whip the heavy cream until stiff peaks form. This is where the magic happens—fluffy clouds of cream that will lighten up your cheesecake mixture.
- Fold in the Whipped Cream: Gently fold the whipped cream into the cream cheese mixture. Take your time with this step—you’re folding in air to create that fabulous lightness we all crave in a cheesecake!
- Layer It Up: Layer the cheesecake mixture over the Oreo crust you’ve created, followed by a layer of chopped Oreos.
- Refrigerate and Set: Repeat the layers until your cups are filled, then finish with a dollop of whipped cheesecake on top. Pop these beauties in the refrigerator for at least 120 minutes before serving.
Notes
These cheesecake cups can be stored in the refrigerator for up to 4 days. They are best enjoyed chilled, so keep them covered. Feel free to customize with different cookie flavors or add-ins.
Nutrition
- Serving Size: 1 cup
- Calories: 360
- Sugar: 18g
- Sodium: 180mg
- Fat: 24g
- Saturated Fat: 14g
- Unsaturated Fat: 6g
- Trans Fat: 0g
- Carbohydrates: 32g
- Fiber: 1g
- Protein: 4g
- Cholesterol: 30mg