In the cozy corners of my kitchen, nestled between the sweet scent of pastries and the warmth of my favorite mug of coffee, I often find myself reminiscing about one of the most cherished Italian desserts that sparked my love for baking: Pizzelles. These delightful, crisp cookies have tickled my taste buds since childhood, evoking fond memories of holiday gatherings where they adorned the dessert table like little works of art. However, it was when I discovered the irresistible combination of pizzelles and cannoli filling that a new level of joy was unlocked in my baking adventures.
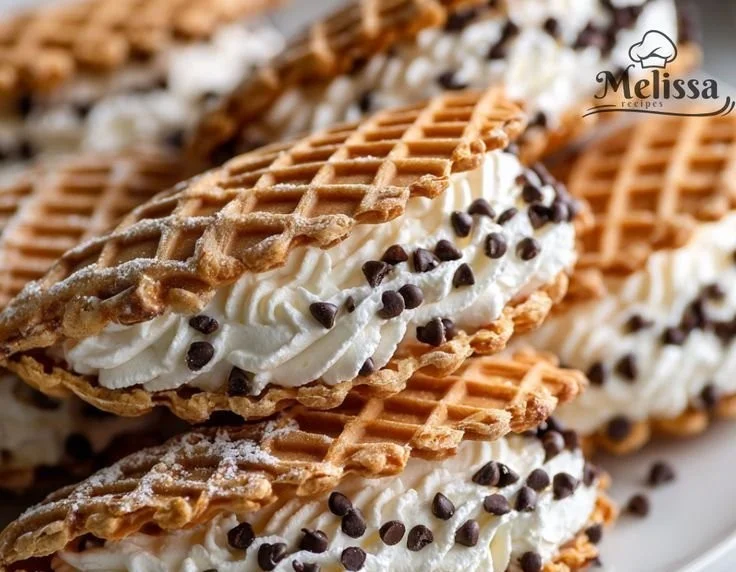
Picture this: a delicate chocolate pizzelle—thin, crisp, and beautiful—sandwiched with a rich, creamy filling that combines the best of both worlds. Each bite is a harmonious blend of flavors and textures, marrying the crunch of the pizzelle with the decadence of a velvety cannoli cream. Today, I’m excited to share my go-to recipe for Chocolate Pizzelles with Cannoli Filling, perfect for any occasion or simply to brighten your day.
Recipe Timing
- Prep Duration: 30 minutes
- Active Cooking: 10 minutes
- Total Duration: 1 hour to 1 hour 30 minutes (including chilling time)
- Portion Size: Serves 8 (2 pizzelle sandwiches per person)
- Complexity: Simple
Nutritional Recipe
- Calories per portion: Approx. 250
- Protein: 5g per serving
- Carbs: 30g per serving
- Fats: 14g per serving
- Fiber: 1g per serving
- Sugars: 12g per serving
- Sodium: 150mg per serving
Why You’ll Love This Chocolate Pizzelles with Cannoli Filling
Imagine a dessert that not only looks stunning but tastes absolutely divine. The chocolate pizzelles provide a unique twist with their rich cocoa flavor, complementing the sweet, creamy filling that’s studded with chocolate chips. This delightful combination doesn’t just satisfy your sweet cravings but also leaves you with a nostalgic sensation reminiscent of sunny days spent at Grandma’s kitchen table. Perfect for serving at parties or simply indulging in a quiet moment at home, these sandwiches will be a treat that you won’t forget.
The Complete Cooking Journey
Let’s walk through the delightful experience of creating your own Chocolate Pizzelles with Cannoli Filling. From preparing the filling to assembling the final product, each step adds to the culinary storytelling that transforms simple ingredients into an unforgettable treat.
Ingredients:
- 8 oz Philadelphia Cream Cheese, softened
- 16 chocolate pizzelles
- 4 oz heavy whipping cream
- 1 1/4 cup powdered sugar
- 1 cup semi-sweet chocolate chips
- 1/2 tsp ground cinnamon
- 1 tsp vanilla extract
Method:
### Step 1: Preparing the Creamy Filling
In a large mixing bowl, beat the softened Philadelphia Cream Cheese until smooth. Add in the powdered sugar, vanilla extract, and ground cinnamon. Mix on low speed until combined and creamy. This step is essential to ensure a smooth texture for the filling that will beautifully enhance the pizzelles.
### Step 2: Whipping the Cream
In another bowl, whip the heavy cream until soft peaks form. Take your time with this step; gentle folding will retain the lightness of the whipped cream, creating a dreamy consistency in your filling.
### Step 3: Combining the Mixtures
Gently fold the whipped cream into the cream cheese mixture until well combined. This is where the magic begins as the mixture transforms into a luscious cream that is begging to be sandwiched between the pizzelles.
### Step 4: Adding Chocolate Chips
Fold in the semi-sweet chocolate chips, ensuring they’re evenly distributed throughout the filling. Each bite will offer a rich surprise that pairs perfectly with the pizzelles.
### Step 5: Chilling
Cover the filling and refrigerate for 1-2 hours. This is the perfect time to clean up your workspace, brew a cup of coffee, or simply dream about how delightfully indulgent your dessert will be!
### Step 6: Assembling the Pizzelles
Once the filling is chilled, use a piping bag to transfer a generous amount of filling onto the flat side of half of the pizzelles. Place another pizzelle on top to create a sandwich. They look so gorgeous already!
### Step 7: Garnishing
Dust your homemade pizzelle sandwiches with powdered sugar or sprinkle a few more chocolate chips on top for added flair. They’re almost too pretty to eat!
### Step 8: Serving
Serve the pizzelle sandwiches within 1-2 hours for the best texture, ideally with a cup of espresso or your favorite herbal tea. If you want to save them for later, store them separately in an airtight container.
Serving Suggestions & Pairings
These Chocolate Pizzelles with Cannoli Filling are perfect for entertaining. They pair wonderfully with a rich coffee, beautifully balancing their sweetness. Consider serving these alongside fruit or a light salad for a well-rounded spread for your next gathering.
Storage & Leftovers Guide
For best results, enjoy these pizzelle sandwiches fresh. However, any leftover filling can be stored separately in an airtight container in the fridge for up to 3 days. If you need to store assembled pizzelles, keep them at room temperature for up to 1 day; they may soften after a full day, so enjoy them quickly!
Kitchen Wisdom & Success Tips
- Cream Cheese: Make sure it’s softened before mixing to avoid lumps.
- Whipping Cream: Be careful not to over-whip the cream. Soft peaks are your sweet spot!
- Chill Time: Don’t skip resting the filling; it allows flavors to meld beautifully.
- Piping Tips: Use a large round piping tip to easily transfer filling.
Flavor Variations & Adaptations
Feel free to play with flavors! A touch of orange zest in the filling, a sprinkle of espresso powder, or using almond extract instead of vanilla can create exciting variations that will elevate each bite.
Reader Questions & Solutions
-
Can I make pizzelles in advance? Yes! Bake your pizzelles a day in advance; store them in an airtight container. Fill just before serving for best texture.
-
What if I don’t have semi-sweet chocolate chips? You can use dark or milk chocolate chips based on your preference, or even chunks if you like a bolder chocolate presence!
-
How can I keep the pizzelle cookies crisp? Keep them in an airtight container at room temperature. If they are filled, serve immediately for best quality.
-
Can I substitute the cream cheese? You can use mascarpone cheese for a lighter flavor or Greek yogurt for a tangier option.
-
What’s the best way to pipe the filling? Use a pastry bag fitted with a round tip. It allows for precision and minimizes mess!
Wrapping Up
Creating these Chocolate Pizzelles with Cannoli Filling is not just about satisfying your sweet tooth; it’s about crafting moments to cherish and memories to share. So roll up your sleeves, pour a glass of your favorite drink, and dive into this delightful dessert. Trust me, your taste buds—and your loved ones—will thank you! Happy baking!
PrintChocolate Pizzelles with Cannoli Filling
Delightful chocolate pizzelles sandwiched with a rich, creamy cannoli filling, perfect for any occasion.
- Prep Time: 30 minutes
- Cook Time: 10 minutes
- Total Time: 90 minutes
- Yield: 8 servings 1x
- Category: Dessert
- Method: Baking
- Cuisine: Italian
- Diet: Vegetarian
Ingredients
- 8 oz Philadelphia Cream Cheese, softened
- 16 chocolate pizzelles
- 4 oz heavy whipping cream
- 1 1/4 cup powdered sugar
- 1 cup semi-sweet chocolate chips
- 1/2 tsp ground cinnamon
- 1 tsp vanilla extract
Instructions
- In a large mixing bowl, beat the softened Philadelphia Cream Cheese until smooth. Add in the powdered sugar, vanilla extract, and ground cinnamon. Mix on low speed until combined and creamy.
- In another bowl, whip the heavy cream until soft peaks form.
- Gently fold the whipped cream into the cream cheese mixture until well combined.
- Fold in the semi-sweet chocolate chips.
- Cover the filling and refrigerate for 1-2 hours.
- Use a piping bag to transfer a generous amount of filling onto the flat side of half of the pizzelles. Place another pizzelle on top to create a sandwich.
- Dust your homemade pizzelle sandwiches with powdered sugar or sprinkle more chocolate chips on top.
- Serve the pizzelle sandwiches within 1-2 hours.
Notes
For best texture, fill the pizzelles just before serving. Any leftover filling can be stored separately in the fridge for up to 3 days.
Nutrition
- Serving Size: 1 sandwich
- Calories: 250
- Sugar: 12g
- Sodium: 150mg
- Fat: 14g
- Saturated Fat: 8g
- Unsaturated Fat: 6g
- Trans Fat: 0g
- Carbohydrates: 30g
- Fiber: 1g
- Protein: 5g
- Cholesterol: 30mg